Volkswagen Golf Service & Repair Manual: Removing and installing temperature flap control motor -V68-, LHD vehicles
| Heater and air conditioning system with electric/manual
controls |
| Special tools and workshop equipment
required |
| Vehicle diagnostic tester |
| – |
Equipment version with ignition lock: Remove ignition key. |
Pyrotechnic components may trigger unintentionally.Risk of
injury.Discharge any static charge accumulated in your body by briefly
touching striker plate for door.
| – |
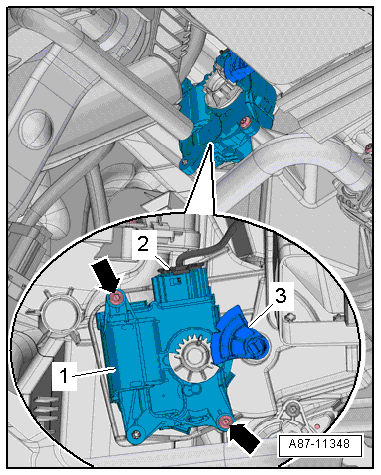
Remove footwell vent on driver side
→ Chapter. |
|
|
|
| – |
Pull actuating lever -3- off
heater unit. |
 Note Note
| The upper bolt can be accessed with a commercially available
ratchet. |
| – |
Unscrew bolts -arrows-. |
| – |
Disconnect electrical connector -2-. |
| – |
Remove temperature flap control motor -V68--1-. |
|
|
|
| Installation is carried out in the reverse order. When
installing, note the following: |
Note
| Check operation of flaps and hinge mechanism before fitting. |
| Make sure levers and shafts are properly fitted in the
mounts. |
| – |
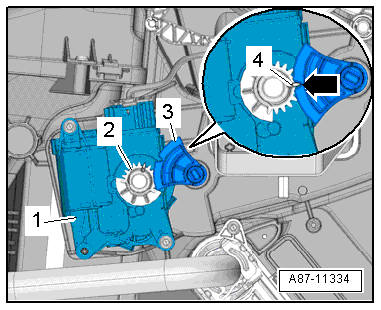
Fit control motor -1- on air
distribution housing. Gear wheel -2-
on control motor must engage in the gear wheel
-3- on actuating lever. |
| The long tooth -4- must engage
in recess -arrow- on actuating
lever. |
Note
| If the gear wheels on the control motor and temperature flap
lever do not align, rotate the receptacle in the control motor. |
| If the bolts cannot be fitted, the control motor is not
completely seated on the housing. |
| – |
Switch on ignition, connect respective control motor to
vehicle wiring harness and select a setting on operating and
display unit to set control motor to desired position (e.g.
mid-position). Wait until control motor has moved to desired
position and switch off ignition. |
| – |
Route wiring harness so that it cannot come into contact
with any moving parts (e.g. actuating arm on control motor). |
| – |
Read event memory, and clear any entries displayed. Then,
perform “basic setting”vehicle diagnostic tester in “Guided
fault finding” mode. |
| – |
As a final step, check operation of heater and air
conditioning system. |
| → Chapter „Assembly overview - heater and air conditioning unit“ |
|
|
|
1 -
Control motor for fresh air and air recirculation flap and air flow
flap -V425-
With potentiometer for fresh air/recirculated air and air flow flap ...
Heater and air conditioning system with electric/manual
controls
Special tools and workshop equipment
required
Veh ...
Other materials:
Checklist
Using seat belts :
Check the condition of all seat belts
regularly.
Keep the seat belts clean.
Never let any foreign bodies and liquids
get on to the seat belt, the latch plate or into the slot for the seat belt
buckle.
Do not trap or damage the seat belt and
latc ...
Installing roof reinforcement to body, estate with sliding sunroof
Special tools and workshop equipment
required
Electric cutter -V.A.G 1561A
Scraping blade -V.A.G 1561/20
...
Routing and securing wiring
Mark lines prior to removal to prevent them from being
interchanged and to ensure that they are fitted in their
original positions. This applies for fuel, hydraulic and vacuum
lines as well as lines for activated charcoal filter system and
electrical wir ...
© 2016-2026 Copyright www.vwgolf.org

 Overview of fitting locations - front control motors, Climatronic, RHD
vehicles
Overview of fitting locations - front control motors, Climatronic, RHD
vehicles Removing and installing temperature flap control motor - V68-, RHD vehicles