VW Golf manuals

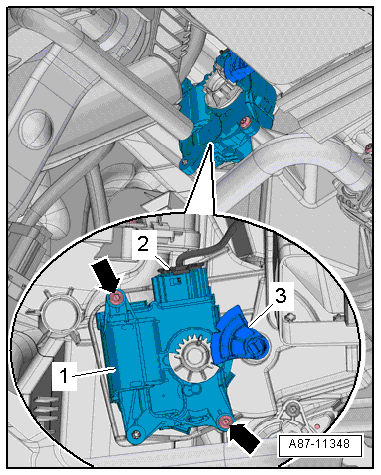
Volkswagen Golf Service & Repair Manual: Removing and installing temperature flap control motor - V68-, RHD vehicles

Volkswagen Golf Service & Repair Manual / Heating, air conditioning / Air conditioner / Control motors / Removing and installing temperature flap control motor - V68-, RHD vehicles

Heater and air conditioning system with electric/manual controls
Special tools and workshop equipment required
Vehicle diagnostic tester
Removing
–  Switch off ignition.
–  Remove baffle plate → Chapter.
–  Remove centre console trim in footwell → General body repairs, interior; Rep. gr.68.
   
–  Pull actuating lever -3- off heater unit.
  Note
The upper bolt can be accessed with a commercially available bit ratchet.
–  Unscrew bolts -arrows-.
–  Disconnect electrical connector -2-.
–  Remove temperature flap control motor -V68--1-.
 

Removing and installing temperature flap control motor - V68-, RHD vehicles

Installing
Installation is carried out in the reverse order. When installing, note the following:
  Note
Check operation of flaps and hinge mechanism before fitting.
Make sure levers and shafts are properly fitted in the mounts.
–  Fit control motor -1- on air distribution housing. Gear wheel -2- on control motor must engage in the gear wheel -3- on actuating lever.
The long tooth -4- must engage in recess -arrow- on actuating lever.
  Note
If the gear wheels on the control motor and temperature flap lever do not align, rotate the receptacle in the control motor.
If the bolts cannot be fitted, the control motor is not completely seated on the housing.
–  Switch on ignition, connect respective control motor to vehicle wiring harness and select a setting on operating and display unit to set control motor to desired position (e.g. mid-position). Wait until control motor has moved to desired position and switch off ignition.
–  Route wiring harness so that it cannot come into contact with any moving parts (e.g. actuating arm on control motor).
–  Read event memory, and clear any entries displayed. Then, perform “basic setting”vehicle diagnostic tester in “Guided fault finding” mode.
–  As a final step, check operation of heater and air conditioning system.
Specified torque
→ Chapter „Assembly overview - heater and air conditioning unit“
Centre console trim in footwell → General body repairs, interior; Rep. gr.68.
 

Removing and installing temperature flap control motor - V68-, RHD vehicles

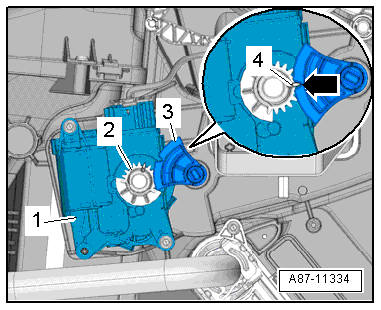
Removing and installing temperature flap control motor -V68-, LHD vehicles
Heater and air conditioning system with electric/manual controls Special tools and workshop equipment required Veh ...

Removing and installing defroster flap control motor -V107- with potentiometer -G135-, LHD vehicles
Special tools and workshop equipment required Vehicle diagnostic tester First carry out the following work: ...

Other materials:

Bag hook
Fig. 100 In the luggage compartment: bag hook First read and observe the introductory information and safety warnings There may be a bag hook on upper left and right-hand side of the luggage compartment   (arrows). WARNING Never use the bag hooks as fastening rings for straps. The bag ...

Refrigerant circuit seals
Renew seals. Moisten seals with refrigerant oil before installing. Ensure proper seating of seals on the pipe or in the groove. Work in a completely clean environment (the smallest particles ...

Data Sharing
For quality assurance and to support the continuous improvement of advanced features such as Autopilot, your Model X may collect analytics, road segment, diagnostic, and vehicle usage data and send to Tesla for analysis. This analysis helps Tesla improve products and services by learning from t ...

© 2016-2023 Copyright www.vwgolf.org