Volkswagen Golf Service & Repair Manual: Removing and installing luggage compartment light -W3-
 Caution
| Danger of damage to component surfaces. |
| When using leverage tools, mask visible areas of the
component with commercially available adhesive tape. |
|
|
|
|
| – |
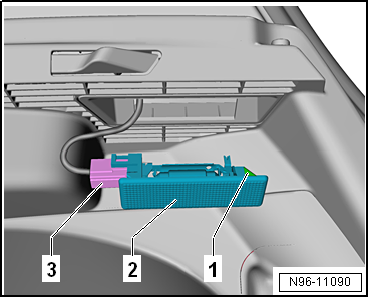
Press in locking lug -1- using
a flat screwdriver and lever out luggage compartment light -W3--2-. |
| – |
Disconnect electrical connector -3-. |
|
|
|
| – |
If necessary, lever off heat shield
-2- on both sides at arrows -A-. |
| – |
Remove heat shield -2- from
glove compartment light -W3--1-. |
|
|

|
| – |
Press contact plate -1- of
light in direction of arrow. |
| – |
Remove festoon bulb -2- from
bulb holder. |
| Install in the reverse order of removal, observing the
following: |
| – |
If present, attach heat shield to luggage compartment light. |
| – |
Insert luggage compartment light into opening and engage it
on opposite side. |
|
|

|
Removing
Note
The selector lever position display -Y26--1-
is integrated in the selector lever gaiter and cannot be removed
...
Note
If an LED vanity mirror light is faulty, the entire light
must be renewed.
Removal and installation are described for ...
© 2016-2026 Copyright www.vwgolf.org

 Removing and installing selector lever position display -Y26-
 Removing and installing illuminated vanity mirror -W20-/-W14-