Volkswagen Golf Owners Manual: Windscreen wiper lever
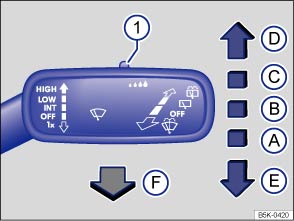
Fig. 86 Operating the front windscreen wiper
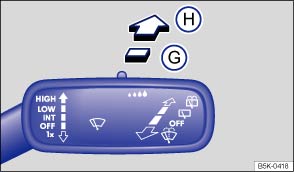
Fig. 87 Operating the rear window wiper
 First read and observe the introductory information
and safety warnings
First read and observe the introductory information
and safety warnings | Move the lever into the required position : | ||
|---|---|---|
| Ⓐ |
 
|
Switches off the windscreen wiper. |
| Ⓑ |
 
 |
Interval wipe for the windscreen. |
| Ⓒ |

 |
Slow wipe. |
| Ⓓ |

 |
Fast wipe. |
| Ⓔ |
 x x |
Flick wipe – wipes briefly. Push and hold the lever down for longer to wipe more quickly. |
| Ⓕ |
 |
Pulling the lever activates the wash and wipe system for cleaning the windscreen. |
| Ⓖ |
 |
Interval wipe for the rear window. The windscreen wiper will wipe the window approximately every 6 seconds. |
| Ⓗ |
 |
Pushing the lever activates the wash and wipe system for cleaning the rear window. |
| ① |
 |
Set the interval lengths with the switch (vehicles without rain sensor) or adjust the sensitivity of the rain sensor. |

 NOTICE
- Remove any snow and ice from the wipers before setting off.
- Carefully detach wiper blades that have become frozen onto the windscreen. Volkswagen recommends using a de-icer spray for this.
NOTICE


 button and the
  and
Mirror and wipers function buttons in the infotainment system .
and
Mirror and wipers function buttons in the infotainment system . Indicator lamp
First read and observe the introductory information
and safety warnings
Lit up
Possible cause
Solution
Windscreen washer fluid leve ...
 Windscreen wiper functions
First read and observe the introductory information
and safety warnings
Windscreen wiper response in various situations:
When the vehicle
is station ...
Other materials:
Checking electromechanical parking brake, vehicles with four-wheel drive
Activate »TЬV mode«:
Seat belt is fitted
Rear axle on single-axle roller dynamometer
Engine is switched off and ignition is switched on
Auto-hold is switched o ...
Front brakes
Item
PR No.
1ZF
1
Brake caliper
FS
III (15”)
2
Brake pad,
thickness
mm
12
Brake pad, wear limit
without backplate
mm
2
3
Brak ...
Removing and installing door arrester
Special tools and workshop equipment
required
Note
The description of removal and installation only applies
to the left wing. The right side is si ...
