Volkswagen Golf Service & Repair Manual: Vehicles with torsion beam axle
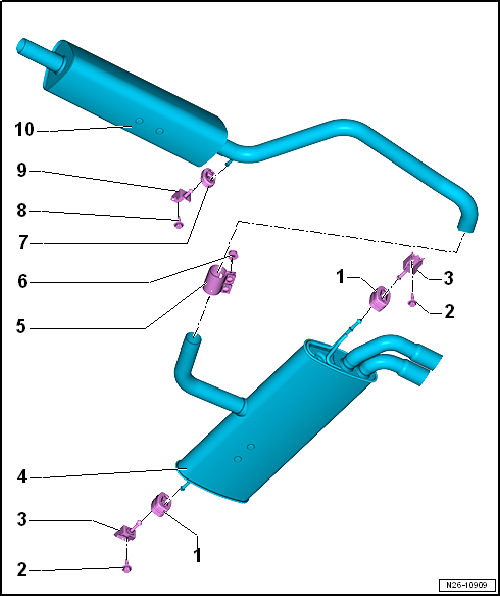
| 1 - | Rubber mounting |
| Renew if damaged |
| 2 - | Bolt |
| 20 Nm |
| 3 - | Mounting |
| Renew if damaged |
| 4 - | Rear silencer |
| In initial equipment, component with centre silencer. Can be renewed individually for repair purposes. |
| Removing and installing → Chapter |
| Separating exhaust pipes/silencers → Chapter |
| Aligning exhaust system free of tension → Chapter |
| 5 - | Rear clamp |
| Align exhaust system free of tension before tightening → Chapter. |
| Installation position → Fig. |
| Tighten threaded connections evenly. |
| 6 - | Nut |
| 30 Nm |
| 7 - | Rubber mounting |
| Renew if damaged |
| 8 - | Bolt |
| 20 Nm |
| 9 - | Mounting |
| Renew if damaged |
| 10 - | Centre silencer |
| Combined in one unit with rear silencer as original equipment. Can be renewed individually for repair purposes. |
| Removing and installing → Chapter |
| Separating exhaust pipes/silencers → Chapter |
| Aligning exhaust system free of tension → Chapter |

 Vehicles with multilink suspension
1 -
Rubber mounting
Renew if damaged
2 -
Bolt
20 Nm
3 -
Mounting
...
Other materials:
Trade names and designations
Refrigerant R134a is currently available under the following
trade designations:
H-FKW 134a
SUVA 134a
KLEA 134a
Note
Other trade designations ...
Assembly overview - three-point seat belt, 2-door model, with belt tensioner
1 -
Belt inertia reel
Removing and installing
→ Chapter
2 -
Electrical wiring harness
3 -
Bolt
If removed due to an accident with seat belt fastened, renew bolt.
40 Nm
4&nbs ...
Suction feed spray-gun -V.A.G 1538
Designation:
Suction feed spray-gun -VAG 1538-
Product description:
Tool for sealing cavities in all new and used cars and for
applying underbody sealant.
Design, features an ...
