Volkswagen Golf Service & Repair Manual: Vehicles with multilink suspension
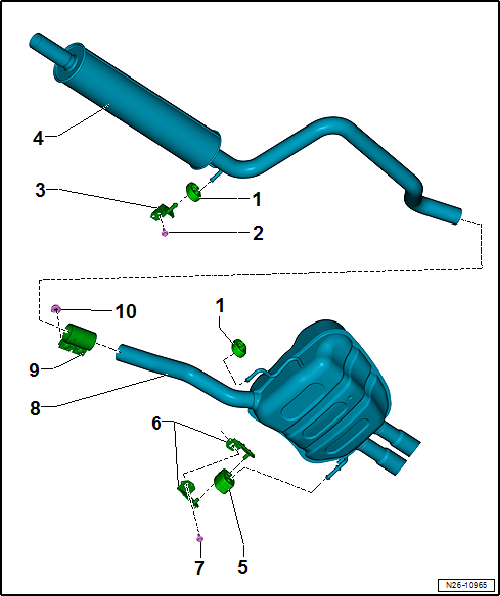
| Combined in one unit with rear silencer as original equipment. Can
be renewed individually for repair purposes. |
| Removing and installing
→ Chapter |
| Separating exhaust pipes/silencers
→ Chapter |
| Aligning exhaust system free of tension
→ Chapter |
| In initial equipment, component with centre silencer. Can be renewed
individually for repair purposes. |
| Removing and installing
→ Chapter |
| Separating exhaust pipes/silencers
→ Chapter |
| Aligning exhaust system free of tension
→ Chapter |
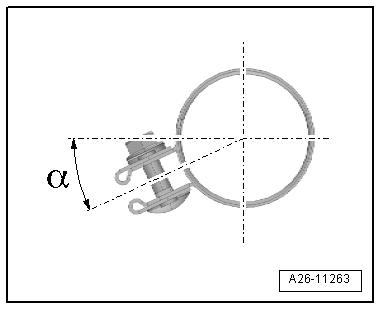
| Align exhaust system free of tension before tightening
→ Chapter. |
| Installation position
→ Fig. |
| Tighten threaded connections evenly. |
| Installation position of rear clamp |
| – |
Fit clamp in position shown. |
| Bolt connections face to rear. |
|
|
|
1 -
Rubber mounting
Renew if damaged
2 -
Bolt
20 Nm
3 -
Mounting
...
Removing
–
If fitted, remove rear left underbody trim
→ General body repairs, exterior; Rep. gr.66.
...
Other materials:
Cigarette lighter, socket
Removing and installing cigarette lighter
-U1-
Note
All instructions and notes regarding this chapter are
available under
→ Electrical System, General Information; Rep. gr.96.
&nb ...
Removing and installing front 3-point seat belt, 2-door model
Removing
WARNING
Observe safety instructions for pyrotechnic
components
→ Chapter.
Observe disposal regulations ...
Lights, lamps, switches outside
Operation and safety notes for gas
discharge bulbs
–
If repairs are to be made to the headlight with gas
discharge bulbs, observe the following:
Notes on dangerous high voltage/currents
→& ...
© 2016-2026 Copyright www.vwgolf.org

 Vehicles with torsion beam axle
 Vehicles with torsion beam axle