Volkswagen Golf Service & Repair Manual: Repairing shock absorber
| Removing and installing
→ Chapter |
| Defective shock absorbers must always be degassed and drained before
disposal
→ Chapter |
| Checking shock absorber following removal
→ Chapter |
| 4 - |
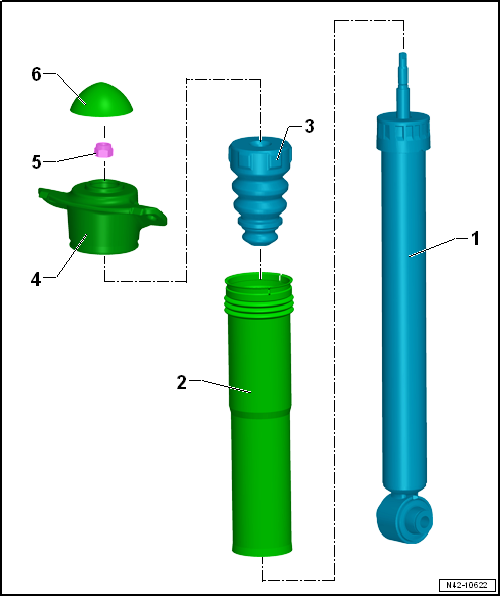
Shock absorber mounting |
| Loosening and tightening
→ Fig. |
| Special tools and workshop equipment
required |
|
|
|
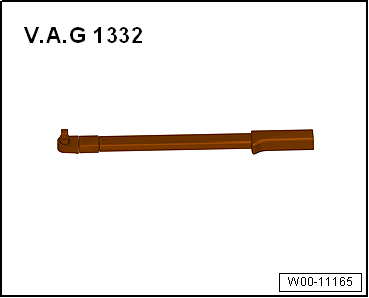
| Torque wrench -V.A.G 1331- |
|
|
|
| Shock absorber set -T10001- |
| Ring spanner insert (commercial type, e.g.
»Hazet 6630c-21«) |
|
|

|
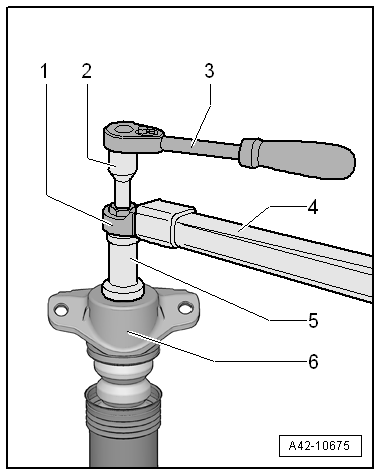
| Loosening and tightening threaded connection for shock
absorber mounting |
| 1 - |
Ring spanner insert (commercial type, e.g.
»Hazet 6630c-21«) |
| 3 - |
Commercially available ratchet handle |
| 4 - |
Torque wrench -V.A.G 1331- |
| 6 - |
Shock absorber mounting |
| Install in reverse order of removal, observing the
following: |
|
|
|
| – |
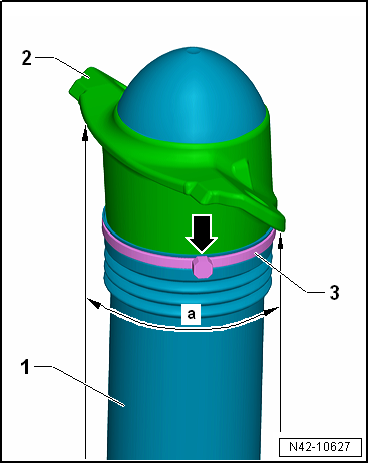
Slide protective tube -1- onto
shock absorber mounting -2-. |
| – |
Fit cable tie -3- and tighten. |
 Note Note
| The fastener -arrow- of the
cable tie -3- must be located
within area -a-. |
| → Chapter „Repairing
shock absorber“ |
|
|
|
Special tools and workshop equipment required
Torque wrench -V.A.G 1332-
Torque wrench -V.A.G 1410-
Spring compressor -V.A.G 1752/1 ...
Special tools and workshop equipment
required
Spring compressor -V.A.G 1752/1-
&nb ...
Other materials:
Air conditioning system pressure switch -F129
This pressure switch has 3 functions:
1. Switches radiator fan to next higher speed when pressure
increases in refrigerant circuit (approx. 16 bar).
2. Switches the air conditioning system off in the event of
excess ...
Removing and installing Hall sender -G40-
Removing
–
Release hose clips -1- and
-2-, and remove air pipe.
–
Disconnect electrical connector -1-.
...
Cruise control system (CCS)
Cruise control system (CCS)
General description:
The functions of the cruise control system are controlled by
the engine control unit.
–
The cruise control system can be activated/deactivat ...
© 2016-2026 Copyright www.vwgolf.org

 Removing and installing shock absorber, multi-link suspension, right shock
absorber
Removing and installing shock absorber, multi-link suspension, right shock
absorber Removing and installing spring, torsion beam axle