Volkswagen Golf Service & Repair Manual: Removing and installing windscreen
 Note Note
| |
The removal of a bonded window is described using the
Removal kit for flush bonded windows -V.A.G 1474 A-. |
| |
Alternatively, you can also use the cutting tool for bonded
windows -VAS 6452-. |
| |
Another alternative is to use the window removal set -VAS
6888-. |
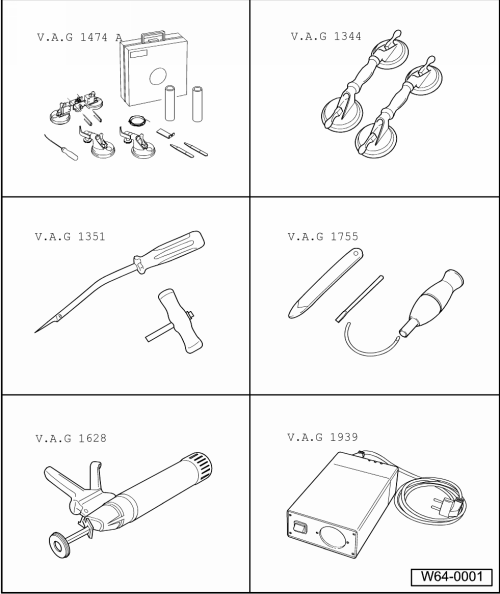
| Special tools and workshop equipment
required |
| |
Removal kit for flush bonded windows -V.A.G 1474 A- or
Removal kit for flush bonded windows -VAS 6452- |
| |
Suction lifter -V.A.G 1344- |
| |
Cutting tool -V.A.G 1351- |
| |
Windscreen removal kit -V.A.G 1755- |
| |
Cartridge gun -V.A.G 1628- |
|
|
|
| |
Cartridge heater -V.A.G 1939- |
| |
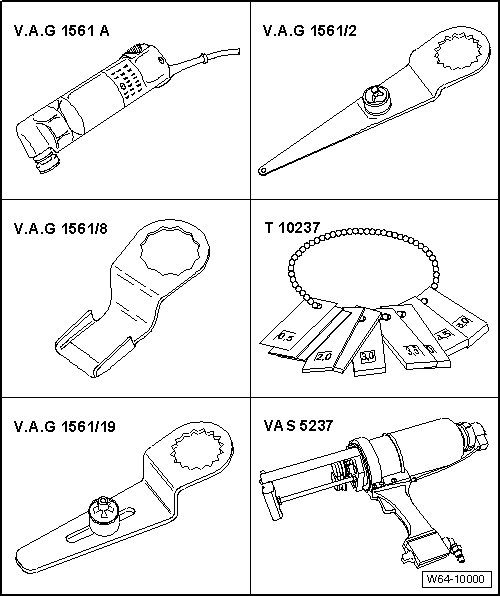
Electric cutter -V.A.G 1561 A- |
| |
Cutting blade -V.A.G 1561/2- |
| |
Cutting blade -V.A.G 1561/8- |
| |
Cutting blade -V.A.G 1561/19- |
|
|
|
| |
Double cartridge gun -VAS 5237- |
| – |
Remove A-pillar upper trims on left and right
→ General body repairs, interior; Rep. gr.70. |
| – |
Remove left and right sun visors
→ General body repairs, interior; Rep. gr.68. |
| – |
Remove interior mirror
→ General body repairs, interior; Rep. gr.68. |
| – |
For vehicles with front camera for driver assist systems
-R242- remove front camera
→ Electrical system; Rep. gr.96 |
| – |
Lower moulded headliner in area of windscreen
→ General body repairs, interior; Rep. gr.70. |
| – |
Moulded headliner can now be lowered sufficiently to allow
windscreen to be cut out without damage occurring to moulded
headliner. |
| – |
Removing plenum chamber cover
→ Chapter. |
|
|
|
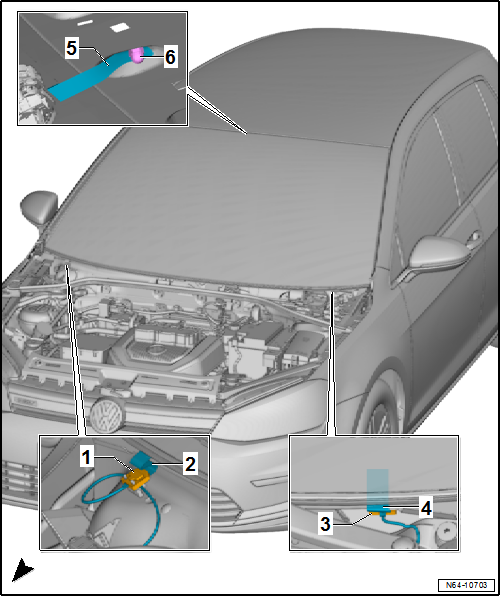
| On vehicles with heated windscreen |
| – |
Unscrew hexagon nut -6-, and bond line
-5- to windscreen. |
| – |
Disconnect connectors -1 and 3-. |
| – |
Bond lines -2 and 4- to windscreen. |
| – |
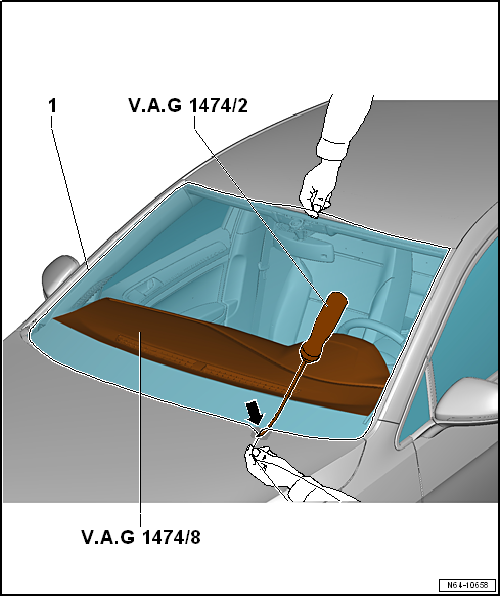
Slide suitable covering film -V.A.G 1474/8- between windscreen and
dash panel. |
| – |
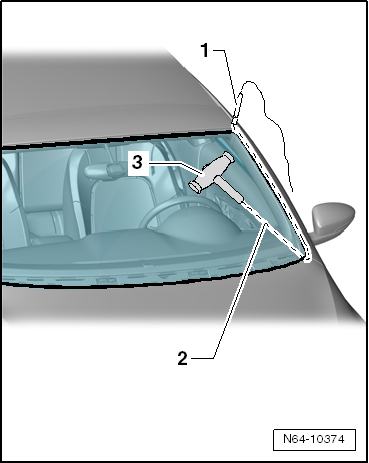
Pull cutting cord -1- through adhesive
sealing material into inside of vehicle using awl -V.A.G 1474/2-. |
| – |
Secure inside end of cutting cord against falling out using
Pull toggle -V.A.G 1351/1--3-. |
| – |
Insert cutting cord -2- into
window flange using tube -1-. |
| – |
Place cutting cord around the front windscreen. |
| – |
Ensure that cutting cord lies under front windscreen in
corners. |
|
|
|
| – |
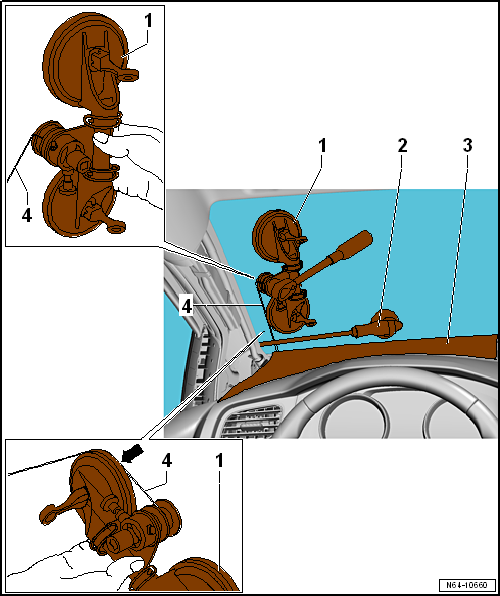
Attach the ends of cords -4- on removal
kit for flush bonded windows -VAS 6452--1-. |
| – |
Put cutting cord around suction cups of reel device
-arrow-. |
| – |
Use plastic wedge -2- to press cutting
cord against windscreen while cutting in order to have clearance at
window flange and dash panel. |
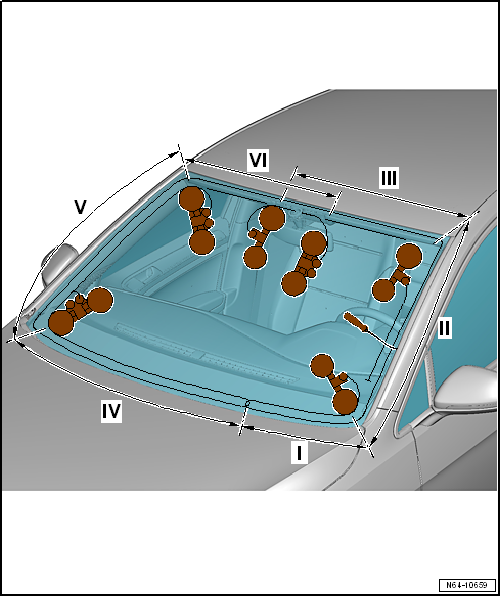
| – |
Position removal kit for flush bonded windows -VAS 6452- at lower
corners of windscreen. |
| – |
Change permanently position of left removal kit for flush bonded
windows -VAS 6452- from “position I”to “position III” and cut windscreen
free. |
| – |
Change permanently position of right removal kit for flush bonded
windows -VAS 6452- from “position IV”to “position VI” and cut windscreen
free. |
| – |
Use two suction lifters -V.A.G 1344- to lift the windscreen from the
vehicle. |
 Note
Note
| |
The windscreen as a genuine replacement part is delivered with
spacers. |
| |
In vehicles without panorama sliding sunroof, the spacers
-1- remain installed. |
| |
In vehicles with panorama sliding sunroof, the seal
-4- must be installed. |
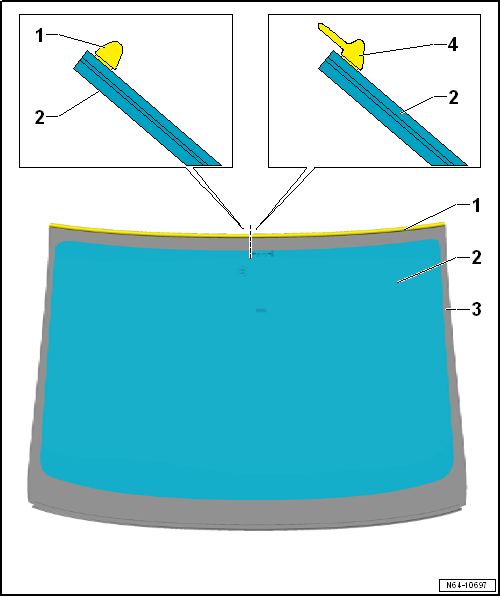
| – |
Separate spacers -1- with a suitable
tool. |
| – |
Bond seal -4- to edge of windscreen. |
| – |
For vehicles with front camera for driver assist systems
-R242- install front camera
→ Electrical system; Rep. gr.96 and calibrate front
camera
→ Running gear, axles, steering; Rep. gr.44. |
| – |
Preparing old undamaged window for glazing
→ Chapter. |
| – |
Preparing new window for glazing
→ Chapter. |
| – |
Preparing body flange for glazing
→ Chapter. |
| – |
Installation instructions
→ Chapter |
| – |
Minimum curing period
→ Chapter |
|
|
|
| Removing broken windscreen |
| Removal of a broken windscreen is performed in the same
manner as the removal a broken rear window
→ Chapter. |
|
|
|
1 -
Windscreen
Removing and installing
→ Chapter
2 -
PUR adhesive sealant
Cross section of bead: -width b- = 7 m ...
Other materials:
Professional cleaning cloth -VAS 6006
Designation:
Professional cleaning cloth -VAS 6006-
Product description:
The cloth is suitable for cleaning dust and micro dust from
dry surfaces. It has anti-static properties when used to clean
...
Windscreen wiper functions
First read and observe the introductory information
and safety warnings
Windscreen wiper response in various situations:
When the vehicle
is stationary.
When switched
on, the wipers will temporarily be switched to the next setting down.
...
Trade names and designations
Refrigerant R134a is currently available under the following
trade designations:
H-FKW 134a
SUVA 134a
KLEA 134a
Note
Other trade designations ...
© 2016-2026 Copyright www.vwgolf.org

 Note
Note


 Note
Note
 Assembly overview - windscreen
 Rear window

