Volkswagen Golf Service & Repair Manual: Repairing rain and light sensor, TRW
| The housings for the rain and light sensors -G397- from
various manufacturers differ. |
| The sensor housing with lens unit is always supplied as a
replacement part in separate parts with retaining clips. In
vehicles which do not require these retaining clips, the clips
must be removed. |
| Perform the following procedure: |
| – |
Remove rain and light sensor -G397-
→ Chapter. |
 Caution
| The sensor electronics may be damaged. |
| When separating the housing parts, do not insert the
screwdriver as far as the sensor electronics. |
| Do not touch the rain sensor electronics.
|
|
|
|
|
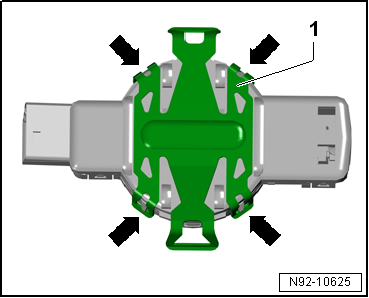
| – |
Release 4 locking lugs -arrows-
of retaining clip -1- using a
suitable screwdriver, and remove retaining clip. |
|
|
|
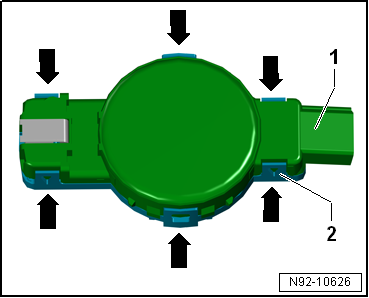
| – |
Separate upper part of housing -1-
together with lens unit from bottom part of housing
-2- by releasing retaining lugs
-arrows- on both sides. |
Caution
| The optical unit of the sensor may be damaged. |
| Do not touch the lens unit. |
|
|
|
|
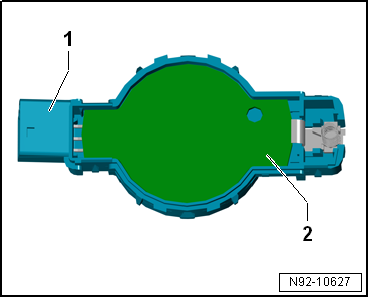
| – |
Remove sensor electronics -2-
from upper part of old housing -1-
and insert into new upper part of new housing in exactly same
way. |
| – |
Engage upper part of housing with lens unit and protective
cover with lower part of housing. |
| – |
Install rain and light sensor -G397-
→ Chapter. |
|
|
|
Note
The rain and light sensor has a silicon layer (coupling pad)
which forms the contact surface to the windscreen.
The r ...
Remove rain and light sensor -G397-
→ Chapter.
–
Carefully remove sensor foil -2-
...
Other materials:
Removing and installing onboard supply control unit -J519-, LHD vehicles
Note
When renewing the control unit, select
Renew function for the respective control unit in
Guided fault finding or
Guided functions mode
→ Vehicle
diagnostic tester.
Removing
â ...
Changing a blown fuse
Fig. 232 Blown fuse: A: flat blade fuse,
B: JCASE® fuse
Fig. 233 Remove or insert fuse with plastic
pliers: A. flat blade fuse, B. JCASE® fuse
First read and observe the introductory information
and safety warningsPreparation
Switch off the ignition, the lights and all electrical co ...
Repair paintwork system for matt-finished vehicles
Issue 04.13
The repair paintwork system for matt-finished vehicles is
outlined below. Area of use: larger areas/full painting
operations
Application
Metal substrate
...
© 2016-2026 Copyright www.vwgolf.org


 Removing and installing rain and light sensor, vehicles without front camera
for driver assist systems
Removing and installing rain and light sensor, vehicles without front camera
for driver assist systems Repairing rain and light sensor, Valeo