Volkswagen Golf Service & Repair Manual: Removing and installing inner door cover
| Special tools and workshop equipment
required |
|
|
|
 Note Note
| Removal and installation are described only for the left
cover. The right side is similar. |
|
|

Removal wedge -3409- |
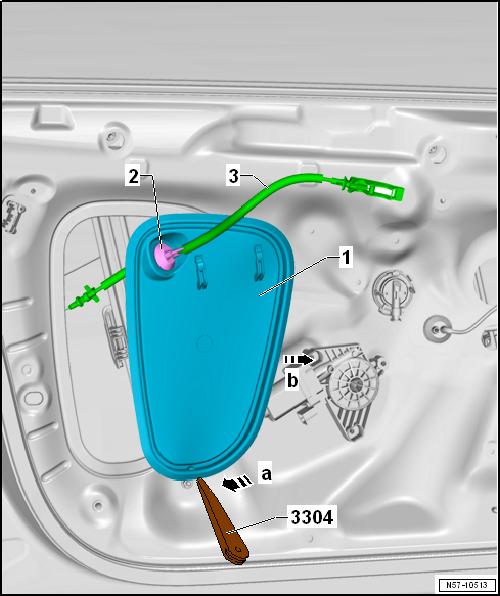
| – |
Remove front door trim
→ General body repairs, interior; Rep. gr.70. |
| – |
Lift lower end of cover -1--arrow a-. |
| – |
Pull cover -1- frontwards out of door
-arrow b-. |
Note
| If required for subsequent work, pull cable
-3- with grommet -2- out of cover
-1-. Separate connector at grommet (if
there is one). |

| – |
Fit cable -3- together with grommet
-2- into cover -1-. |
| – |
Attach grommet -2- to cover
-1-. |
| – |
Insert cover -1- into door
-2--arrow a-. |
| – |
Engage cover -1- around circumference
-arrow b-. |
Note
| Check proper seating of cover by pressing with fingers around
circumference. |
Special tools and workshop equipment
required
Note
Removal and ...
Special tools and workshop equipment
required
Torque wrench -V.A.G 1331-
...
Other materials:
Tyre sealant
Tyre sealant, use-by date
The tyre sealant in the bottle has a limited shelf-life.
The bottle therefore has an expiry date
-arrow-.
Renew tyre sealant when the expi ...
Assembly tools for single wire seals
The assembly tools serve as a means of sliding the single
wire seals fully into the contact housing without damage and
thereby assure complete sealing between single wire and contact
housing.
Four assembly tools for single wire seals are ...
Infrared heater -VAS 6873
Designation:
Infrared heater -VAS 6873-
Product description:
Short-wave infrared heater is used for quick drying of
putty, filler, undercoat, top coat and clear coat for minor
repairs.
...
© 2016-2026 Copyright www.vwgolf.org

 Removing and installing window regulator
 Removing and installing striker pin