Volkswagen Golf Service & Repair Manual: Removing and installing washer fluid reservoir
| Special tools and workshop equipment
required |
 Note Note
| Removal and installation of washer fluid reservoirs with
headlight washer system are described. Removal and installation
of washer fluid reservoirs without headlight washer system are
carried out in the same way. |
| – |
Remove front bumper cover
→ General body repairs, exterior; Rep. gr.63. |
| – |
Remove left headlight
→ Chapter. |
| – |
If necessary, remove headlight washer system pump -V11-
→ Chapter. |
| – |
Place drip tray under washer fluid reservoir. |
|
|
|
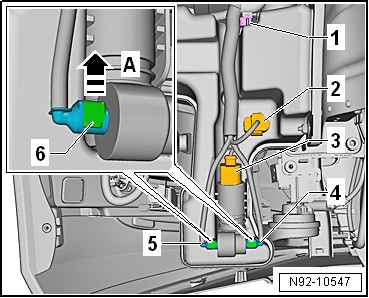
| – |
Release locking lug -3-. |
 Caution
| The washer fluid reservoir is constructed in a
one-piece design. The washer fluid reservoir, the filler
pipe and the filler neck are not intended to be
separated from each other. If they are nevertheless
detached from each other, the connection could then
leak. |
|
| – |
Pull filler neck -1- upwards
out of bracket on lock carrier -2-. |
|
|

|
| – |
Disconnect electrical connectors -2-
and -3-. |
| – |
Release securing clips -6- in
direction of arrow -A-. |
| – |
Pull water lines -4- and
-5- off windscreen washer pump. |
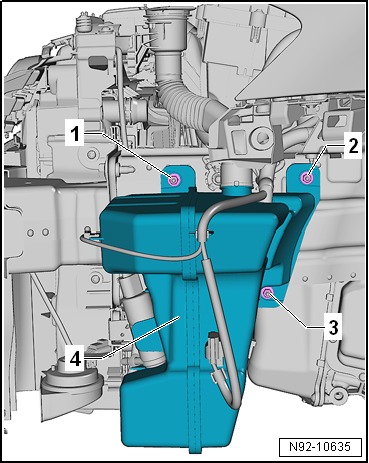
| – |
Detach wiring harness from washer fluid reservoir
-1-. |
|
|
|
| – |
Unscrew nuts -1, 2 and 3-. |
| – |
Pull washer fluid reservoir -4-
off threaded pins. |
| Install in the reverse order of removal, observing the
following: |
Note
| The connections at the pump and hoses are colour-marked to
prevent incorrect connection of the washer fluid lines to the
windscreen and rear window washer pump -V59-. The hose fittings
must be connected to the correct colour-coded pump connections
during installation. |
| → Chapter „Assembly overview - windscreen washer system“ |
|
|
|
1 -
Right spray jet
Versions with right washer jet heater element -Z21-
Removing and installing
→ Chapter
A ...
Special tools and workshop equipment
required
Drip tray
Removing
–
Remove front rig ...
Other materials:
Permanent underbody protection -D 314 D37 M2-, black
Designation:
Permanent underbody protection -D 314 D37 M2-, black
Issued 02.2010
Product description, permanent underbody protection -D 314
D37 M2-, black
Permanent underbody ...
Introduction
This chapter contains information on the following subjects:
→ Petrol
→ Diesel
→ Bioethanol (Ethylalcohol)
Different engines require different fuels. The factory-fitted sticker on the
inside of the tank flap indicates the fuel type that is required for your ...
Removing and installing engine control unit -J623- (with metal locking
plate)
Special tools and workshop equipment
required
Hot air blower -VAS 1978/14A--1-
with nozzle -2- from wiring harness
repair set -VAS 1978 B-
Small grinder (commerci ...
© 2016-2026 Copyright www.vwgolf.org

 Assembly overview - windscreen washer system, without headlight washer
system
Assembly overview - windscreen washer system, without headlight washer
system Removing and installing washer fluid reservoir, »R«