Volkswagen Golf Service & Repair Manual: Removing and installing washer fluid reservoir, »R«
| Special tools and workshop equipment
required |
| – |
Remove front right wheel
→ Running gear, axles, steering; Rep. gr.44. |
| – |
Remove front part of right wheel housing liner
→ General body repairs, exterior; Rep. gr.66. |
| – |
Place drip tray under washer fluid reservoir. |
|
|
|
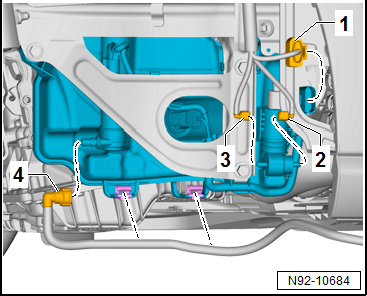
| – |
Disconnect electrical connector -1-. |
| – |
Release securing clips of water lines
-2- and -3-. Pull water
lines off washer pump. |
| – |
Release securing clip of water line
-3-. Pull water line off headlight washer system pump,
and unclip it from washer fluid reservoir. |
| – |
Collect washer fluid in drip tray. |
|
|
|
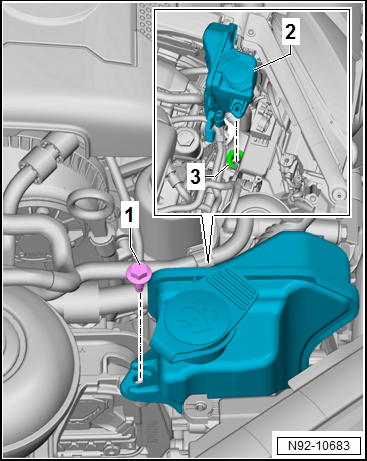
| – |
Pull upper part of washer fluid reservoir
-2- upwards out of seal
-3- in lower part of washer fluid
reservoir. |
|
|
|
| – |
Slightly lower the lower part of washer fluid reservoir
-3-, and release connector
-2-. |
| – |
Remove lower part of washer fluid reservoir
-3- downwards from vehicle. |
| Install in the reverse order of removal, observing the
following: |
 Note Note
| The connections at the pump and hoses are colour-marked to
prevent incorrect connection of the washer fluid lines to the
windscreen and rear window washer pump -V59-. The hose fittings
must be connected to the correct colour-coded pump connections
during installation. |
| → Chapter „Assembly overview – windscreen washer system, with
headlight washer system, R“ |
|
|
|
Special tools and workshop equipment
required
Drip tray
Note
Removal and installation of washer fluid res ...
Removing
–
Remove washer fluid reservoir
→ Chapter.
– ...
© 2016-2026 Copyright www.vwgolf.org

 Removing and installing washer fluid reservoir
 Removing and installing bracket for washer fluid reservoir,
»R«
Removing and installing bracket for washer fluid reservoir,
»R«