Volkswagen Golf Service & Repair Manual: Removing and installing tail light
 Note Note
| Removal and installation are described for the left side.
Removal and installation on the right side are carried out in
the same way. |
| If the event of a defective LED, the entire tail light needs
to be renewed. |
| – |
Turn light switch to “0” position. |
| – |
Open cover in luggage compartment side trim. |
|
|
|
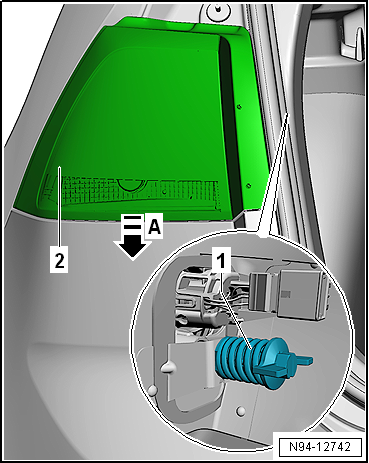
| – |
Unscrew securing element -1-. |
| – |
Disconnect electrical connector. |
| – |
Remove tail light -2- in
direction of arrow -A-. |
| Install in the reverse order of removal, observing the
following: |
| → Chapter „Assembly overview - tail lights in vehicle body, with
bulbs“ |
|
|
|
Note
Installation position can only be corrected on tail light
cluster on body.
Removal and installation are described for ...
Note
Removal and installation are described for the left side.
Removal and installation on the right side are carried out in
the same way.
...
© 2016-2026 Copyright www.vwgolf.org

 Adjusting installation position of tail light
 Removing and installing tail light bulb -M2-/-M4-