Volkswagen Golf Service & Repair Manual: Adjusting installation position of tail light
 Note Note
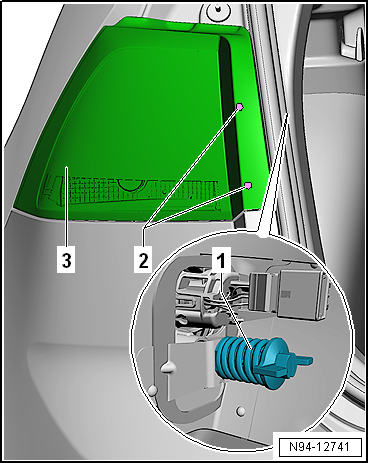
| Installation position can only be corrected on tail light
cluster on body. |
| Removal and installation are described for the left side.
Removal and installation on the right side are carried out in
the same way. |
| – |
Turn light switch to “0” position. |
| – |
Open cover in luggage compartment side trim. |
|
|
|
| – |
Loosen securing element -1- by
two turns. |
| – |
Insert screwdriver T10 bit into trim openings
-2-. |
Note
| Ensure that the tail light -3-
lies flush against the surrounding components. |
| – |
Adjust installation position of tail light by screwing
adjuster elements in or out. |
| – |
Tighten securing element -1-. |
| – |
Close cover in luggage compartment side trim. |
| → Chapter „Assembly overview - tail lights in rear lid, with
bulbs“ |
|
|
|
Note
Removal and installation are described for the left side.
Removal and installation on the right side are carried out in
the same way.
...
Note
Removal and installation are described for the left side.
Removal and installation on the right side are carried out in
the same way.
...
Other materials:
Removing and installing door lock
Special tools and workshop equipment
required
Torque wrench -V.A.G 1331-
Socket -3410-
Note
Rem ...
Assembly overview - front wheel housing liner
Note
Minor differences may be encountered in respect of front
wheel housing liner, depending on vehicle model.
Only the left side is shown. The procedure for the right side
is similar.
1&nbs ...
Introduction
This chapter contains information on the following subjects:
→ Drink holders in the front centre console
→ Drink holders in the rear centre armrest
→ Drink holder in the rear side trim
Bottle holder
Bottle holders are located in the open stowage areas of t ...
© 2016-2026 Copyright www.vwgolf.org

 Removing and installing tail light in rear lid
 Removing and installing tail light