Volkswagen Golf Service & Repair Manual: Removing and installing suspension strut
| Special tools and workshop equipment required |
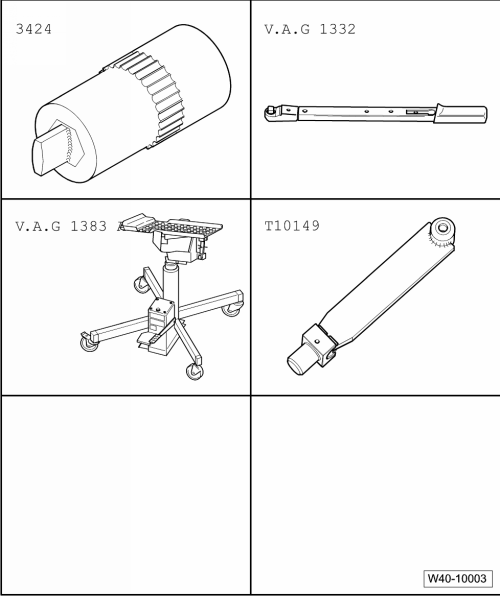
| Torque wrench -V.A.G 1332- |
| Engine and gearbox jack -V.A.G 1383 A- |
| Special tools and workshop equipment
required |
|
|
|
| – |
Loosen drive shaft bolt at wheel hub
→ Chapter. |
 Caution
| Wheel bearings must not be subjected to load after
bolt securing drive shaft to wheel hub has been
loosened. |
| If wheel bearings are loaded with weight of vehicle,
bearing will be damaged. This reduces the service life
of the wheel bearing. |
| It is not permissible to loosen drive shaft bolt
more than 90° if vehicle is standing on its wheels. |
| Do not attempt to move the vehicle without the drive
shafts fitted as this would damage the wheel bearing. If
a vehicle nevertheless has to be moved, comply with the
following: |
| Install an outer joint instead of the drive shaft. |
| Tighten outer joint to 120 Nm. |
|
|
|
|
| – |
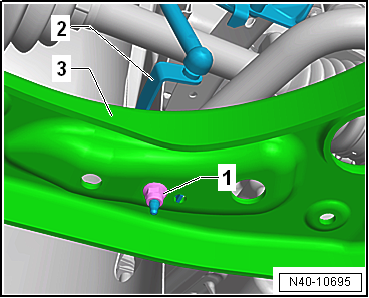
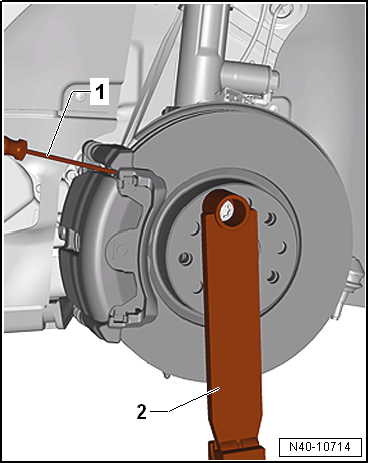
Unscrew nut -arrow- and pull
coupling rod -1- off suspension
strut. |
| – |
Detach wire for ABS speed sensor from suspension strut. |
|
|
|
| Vehicles with vehicle level sender |
| – |
Pull bracket -2- for front left
vehicle level sender -G78- and/or for front right vehicle level
sender -G289- out of suspension link -3-,
as applicable |
| Continuation for all vehicles |
|
|
|
| – |
Pull wheel bearing housing with swivel joint out of
suspension link. |
| – |
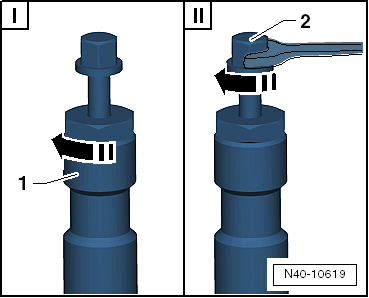
Pull outer joint of drive shaft out of wheel hub. |
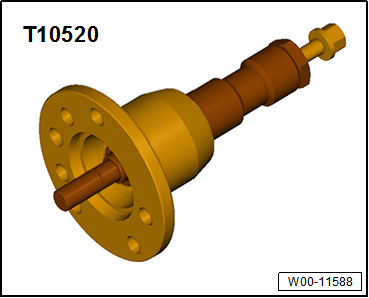
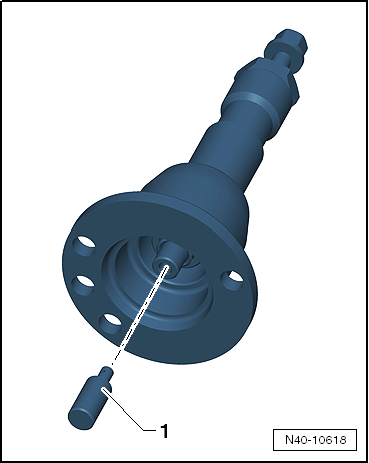
| If drive shaft cannot be pulled out of the wheel bearing by
hand, use press tool -T10520-. |
|
|
|
| Before using press tool -T10520- ensure that thrust piece
-1- is inserted. |
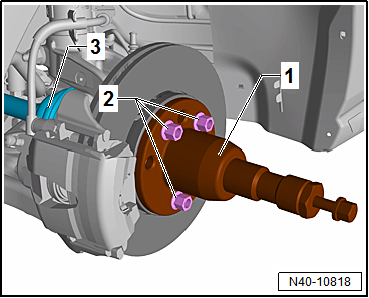
| Using press tool -T10520-: |
|
|
|
| – |
To be able to press out drive shaft
-3-, secure press tool -T10520--1-
to wheel hub using 3 wheel bolts -2-. |
|
|
|
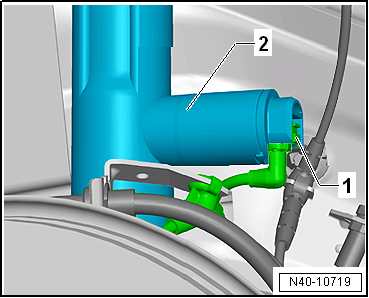
| – |
Disconnect connector -1- on
shock absorber -2-. |
 Note Note
| If there is moisture in the area of the connector, blow
compressed air on the contacts on the shock absorber and the
connector. |
| Continuation for all vehicles |
|
|
|
| – |
Insert a screwdriver -1- into
brake disc between brake caliper and brake carrier. |
| – |
Secure engine and gearbox jack -V.A.G 1383 A- with support
-T10149--2- to wheel hub using a
wheel bolt. |
 WARNING
| Do not lift or lower vehicle while engine and
gearbox jack -V.A.G 1383 A- is under vehicle. The
vehicle could slip off the lifting platform. |
| Do not leave engine and gearbox jack -V.A.G 1383 A-
under vehicle longer than necessary. |
|
|
|
|
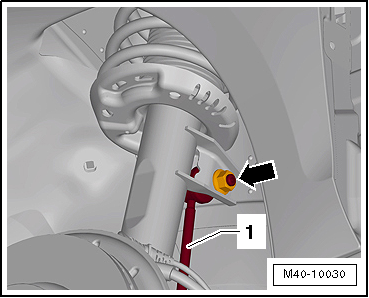
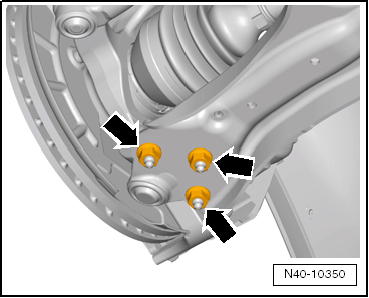
| – |
Separate threaded connection between wheel bearing housing
and suspension strut -arrow-. |
|
|

|
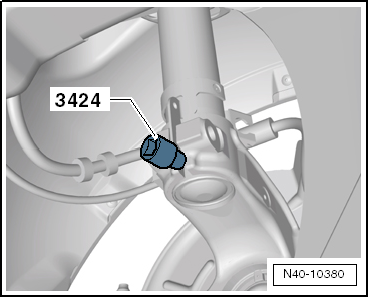
| – |
Insert spreader -3424- in slot in wheel bearing housing. |
Note
| Make sure that the spreader -3424- is only inserted into the
wheel bearing housing. Insert sufficiently to ensure that the
metal tab of the suspension strut is not damaged. |
| – |
Turn ratchet handle through 90° and detach from spreader
-3424-. |
| – |
Press brake disc towards suspension strut by hand. |
| Otherwise the shock absorber tube can cant in the bore of
the wheel bearing housing. |
|
|
|
| – |
Lower wheel bearing housing -1-
in -direction of arrow- using
engine and gearbox jack -V.A.G 1383 A-. |
| – |
Lower wheel bearing housing -1-
until shock absorber is hanging free
-arrow-. |
| – |
Bolt swivel joint to suspension link again and tighten wheel
bearing housing to subframe. |
| – |
Pull engine and gearbox jack -V.A.G 1383 A- out from under
support -T10149-. |
WARNING
| Do not leave engine and gearbox jack -V.A.G 1383 A-
under vehicle longer than necessary. |
|
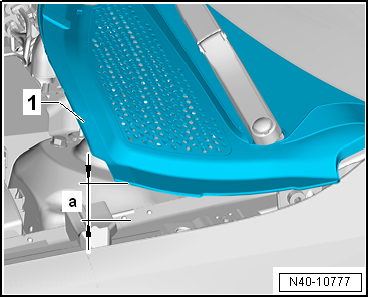
| – |
Pull seal off entire length of plenum chamber cover. |
|
|

|
| – |
Lift plenum chamber cover -1-
not more than 60 mm. |
|
|
|
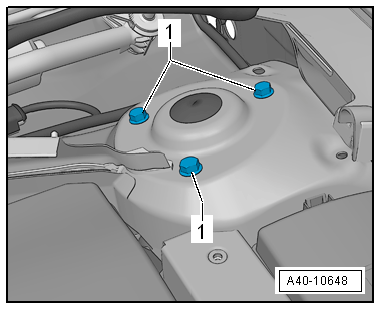
| – |
Unscrew bolts -1- for upper
shock absorber mounting and remove suspension strut. |
|
|
|
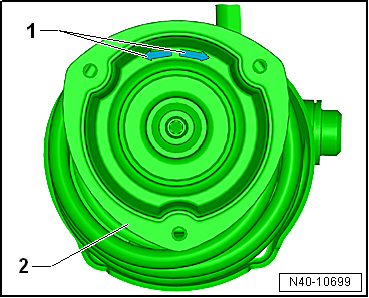
| – |
Position suspension strut so that the arrow
-1- is always on the inner side. |
| – |
One of the two arrows -1- on
the spring plate -2- must point in
direction of travel. |
|
|
|
| – |
Insert suspension strut and bolt bolts
-1- to body. |
|
|
|
| – |
Position engine and gearbox jack -V.A.G 1383 A- under
support -T10149- and secure wheel bearing housing. |
| – |
Untie wheel bearing housing from subframe. |
|
|
|
| – |
Pull wheel bearing housing with swivel joint out of
suspension link. |
|
|
|
| – |
Lower wheel bearing housing -1-
in -direction of arrow- using
engine and gearbox jack -V.A.G 1383 A-. |
| – |
Press wheel bearing housing upwards using engine and gearbox
jack -V.A.G 1383 A-, guide into suspension strut in the process. |
| – |
Bolt swivel joint to suspension link again and continue to
press wheel bearing housing upwards until final position is
reached on suspension strut. |
|
|
|
| – |
Remove spreader -3424-. |
|
|
|
| – |
Insert new bolts, tip of bolt must point in direction of
travel. |
| – |
Attach wheel bearing housing to suspension strut using new
nut -arrow-. |
| Install in reverse order of removal, observing the
following: |
Note
| Lever on vehicle level sender must face towards outside of
vehicle. |
| Thread of vehicle level sender must be screwed into outer
hole in suspension link. Retaining lug for vehicle level sender
must engage in inner hole in order to guarantee correct
installation position. |
| – |
On vehicles with vehicle level sender, carry out basic
settings for wheel damper electronics → Vehicle
diagnostic tester. |
| → Chapter „Assembly overview - suspension strut, upper
suspension link“ |
| → Chapter „Assembly overview - lower suspension link, swivel
joint“ |
| → Chapter „Assembly overview - subframe“ |
| → Chapter „Assembly overview - front vehicle level senders“ |
| → Chapter „Assembly overview - drive shaft“ |
| → Chapter „Torque settings for wheel bolts“ |
|
|
|
1 -
Spring seat
Note correct installation position
2 -
Shock absorber
Different versions are possible. Refer to ...
Special tools and workshop equipment required
Torque wrench -V.A.G 1332-
Spring compressor -V.A.G 1752/1-
Spring retainer -V.A.G 1752/4- ...
Other materials:
Connecting vehicle diagnostic tester
Note
Observe the latest operating instructions for vehicle
diagnosis tester, which are displayed after selecting the
“Administration” and “Operating Manual” keys.
Special tools and workshop equipment
required
...
Assembly overview - pistons and conrods
1 -
Bolts
Renew
Oil threads and contact surface
30 Nm + 90°
2 -
Conrod bearing cap
The conrod bearing cap only fits in one position and only on the
appropriat ...
Operating and display unit
Overview of control and display unit
1 -
Heated driver seat regulator
Optional
Seat heater has 3 heat settings. Current setting is shown by LED.
If no LED is lit, seat heating is switched off.
2 -
...
© 2016-2026 Copyright www.vwgolf.org

 Assembly overview - suspension strut, upper suspension link
 Repairing suspension strut