Volkswagen Golf Service & Repair Manual: Removing and installing pop-up cylinder, »R«
| Special tools and workshop equipment
required |
 Note Note
| Removal and installation are described for the left side.
Removal and installation on the right side are carried out in
the same way. |
| – |
Remove front part of right wheel housing liner
→ General body repairs, exterior; Rep. gr.66. |
| – |
Place drip tray under washer fluid reservoir. |
| – |
Release securing clip of water line. Pull water line off
headlight washer system pump -V11-, and unclip it from washer
fluid reservoir. |
| – |
Collect washer fluid in drip tray. |
| – |
Remove front bumper
→ General body repairs, exterior; Rep. gr.63. |
|
|
|
| – |
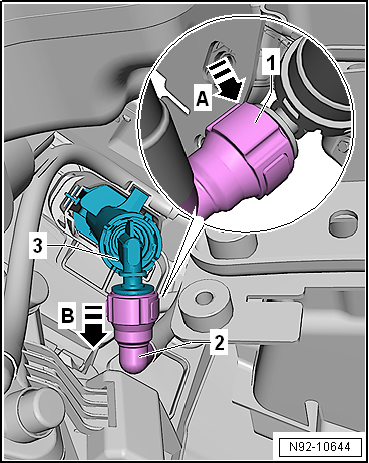
Press release button -1- in
direction of arrow -A-. |
| – |
Pull water hose -2- off pop-up
cylinder -3- in direction of arrow
-B-. |
|
|
|
| – |
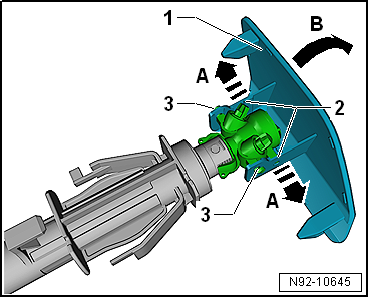
Working with compressed air, drive pop-up cylinder together
with cap -1- out of bumper cover
and hold it in place. |
| – |
Press cap -1- on both sides out
of upper mountings -2- in direction
of arrow -A-. |
| – |
Swing cap -1- in direction of
arrow -B- and unclip it from lower
mountings -3-. |
|
|
|
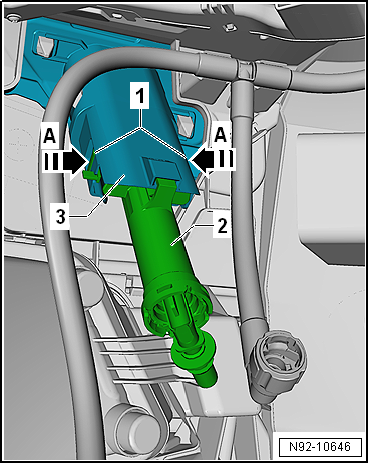
| – |
Press release buttons -1- in
direction of arrow -A-. |
| – |
Pull pop-up cylinder -2-
downwards out of mounting -3-. |
| Install in the reverse order of removal, observing the
following: |
Note
| Observe the markings distinguishing the pop-up cylinders for
left and right. |
| Ensure that the pop-up cylinder engages audibly when being
pushed into the mounting. |
| When connecting the washer fluid line, ensure that the
securing clip engages audibly in the connection. |
|
|
|
Special tools and workshop equipment
required
Drip tray
Removing
Note
Removal and ...
Removing
Note
Removal and installation are described for the left side.
Removal and installation on the right side are carried out in ...
© 2016-2026 Copyright www.vwgolf.org

 Removing and installing pop-up cylinder
 Removing and installing washer jets