Volkswagen Golf Service & Repair Manual: Assembly overview - suspension strut, upper suspension link
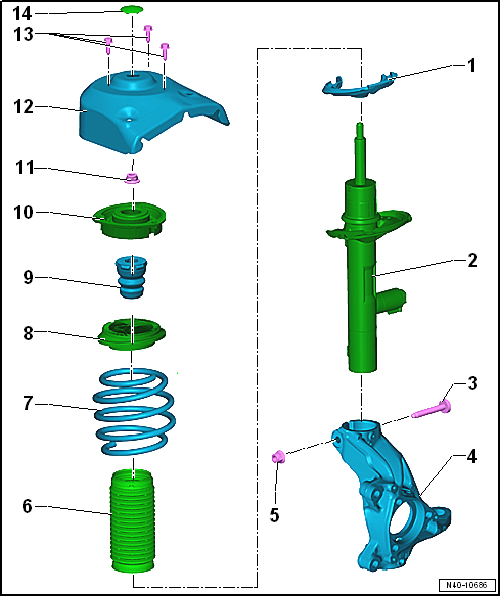
| Note correct installation position |
| Different versions are possible. Refer to
→ Electronic Parts Catalogue “ETKA”. |
| Tip of bolt must point in direction of travel. |
| 4 - |
Wheel bearing housing |
| Different versions are possible. Refer to
→ Electronic Parts Catalogue “ETKA”. |
| Different versions are possible. Refer to
→ Electronic Parts Catalogue “ETKA”. |
| Removing and installing
→ Chapter |
| Surface of spring coil must not be damaged. |
| Different versions are possible. Refer to
→ Electronic Parts Catalogue “ETKA”. |
| 8 - |
Deep groove ball thrust bearing |
| Different versions are possible. Refer to
→ Electronic Parts Catalogue “ETKA”. |
| 10 - |
Suspension strut mounting |
| Note correct installation position
→ Anchor. |
Special tools and workshop equipment required
Torque wrench -V.A.G 1332-
Spreader -3424-
Engine and gearbox jack -V.A.G 1383 A-
...
Other materials:
Paintwork in Aftersales
Panels galvanised on both sides
Earlier attempts at flanged pairings have resulted in the
fact that only panels that are galvanised on both sides are used
now. Only in this way can the cathodic protection and the
barrier effect of the zi ...
Principle circuit diagrams for various purging circuits
Note
The arrows in the following illustrations show the direction
of flow of the refrigerant during purging. The refrigerant flows
against the direction of flow during normal conditioning of the
air, which is why the high-pressure system o ...
Wheel change, installation requirements
Warming cold tyres to minimum installation temperature
Note
This instruction also applies to ultra-high performance
tyres (height/width ratio smaller than/same as 45 % and speed
symbol greater than/same as V).
...
© 2016-2026 Copyright www.vwgolf.org


 Removing and installing suspension strut