Volkswagen Golf Service & Repair Manual: Removing and installing left temperature flap control motor -V158-, LHD
vehicles
| Special tools and workshop equipment
required |
| Vehicle diagnostic tester |
| First carry out the following work: |
| – |
Switch off all electrical consumers. |
Pyrotechnic components may trigger unintentionally.Risk of
injury.Discharge any static charge accumulated in your body by briefly
touching striker plate for door.
| – |
Remove footwell vent on driver side
→ Chapter. |
|
|
|
| – |
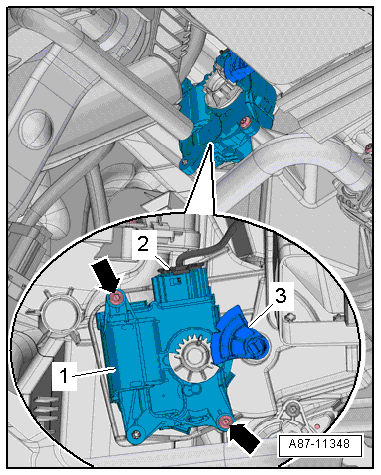
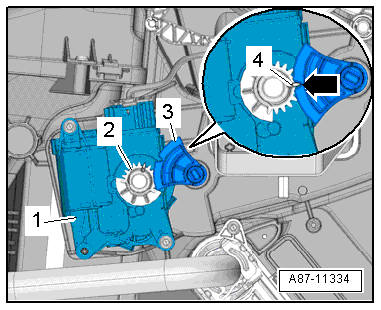
Pull actuating lever -3- off
heater unit. |
 Note Note
| The upper bolt can be accessed with a commercially available
ratchet. |
| – |
Unscrew bolts -arrows-. |
| – |
Disconnect electrical connector -2-. |
| – |
Remove left temperature flap control motor -V158--1-. |
|
|
|
Heater and air conditioning system with electric/manual
controls
Special tools and workshop equipment
required
Veh ...
Special tools and workshop equipment
required
Vehicle diagnostic tester
First carry out the following work:
...
Other materials:
Removing and installing thermostat for small cooling circuit
Removing
–
Remove coolant pump
→ Chapter.
–
Remove bolts in the sequence -F … A-.
–
Detach coolant pump from ...
Warning lamp
First read and observe the introductory information
and safety warnings
Display
Possible cause
Solution
The tailgate is open or not properly closed.
Do not drive
on!
Open the tailgate and then close it again.
Sev ...
Battery
(VRL007981; Edition 04.2015)
WARNING
Danger of injury! Observe warning notices and safety
regulations
→ Chapter!
...
© 2016-2026 Copyright www.vwgolf.org

 Removing and installing air recirculation flap control motor -V113-, RHD
vehicles
Removing and installing air recirculation flap control motor -V113-, RHD
vehicles Removing and installing left temperature flap control motor -V158-, RHD
vehicles
Removing and installing left temperature flap control motor -V158-, RHD
vehicles