VW Golf manuals

Volkswagen Golf Service & Repair Manual: Removing and installing left temperature flap control motor -V158-, RHD vehicles

Volkswagen Golf Service & Repair Manual / Heating, air conditioning / Air conditioner / Control motors / Removing and installing left temperature flap control motor -V158-, RHD vehicles

Special tools and workshop equipment required
Vehicle diagnostic tester
First carry out the following work:
–  Switch off all electrical consumers.
–  Switch off ignition.
–  Remove ignition key.
Removing
–  Remove baffle plate → Chapter.
–  Remove centre console trim in footwell → General body repairs, interior; Rep. gr.68.
   
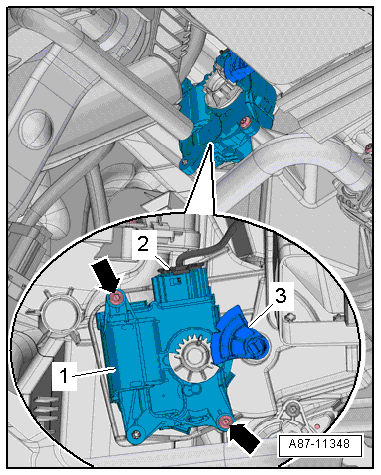
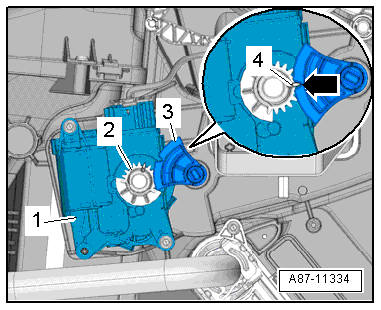
–  Pull actuating lever -3- off heater unit.
  Note
The upper bolt can be accessed with a commercially available bit ratchet.
The illustration shows a left-hand drive vehicle. However, the procedure is analogous.
–  Unscrew bolts -arrows-.
–  Disconnect electrical connector -2-.
–  Remove left temperature flap control motor -V158--1-.
 

Removing and installing left temperature flap control motor -V158-, RHD vehicles

Installing
Installation is carried out in the reverse order. When installing, note the following:
  Note
Check operation of flaps and hinge mechanism before fitting.
Make sure levers and shafts are properly fitted in the mounts.
–  Position control motor -1- on air distribution housing. Gear wheel -2- of control motor must engage in gear wheel -3- of temperature flap lever.
The long tooth -4- must engage in recess -arrow- on actuating lever.
  Note
If the gear wheels on the control motor and temperature flap lever do not align, rotate the receptacle in the control motor.
If the bolts cannot be fitted, the control motor is not completely seated on the housing.
Rotate control motor until it reaches a convenient position for installation. The direction of rotation can be changed by changing polarities.
–  Switch on ignition, connect respective control motor to vehicle wiring harness and select a setting on operating and display unit to set control motor to desired position (e.g. mid-position). Wait until control motor has moved to desired position and switch off ignition.
–  Route wiring harness so that it cannot come into contact with any moving parts (e.g. actuating arm on control motor).
–  Read event memory, and clear any entries displayed. Then, perform “basic setting”vehicle diagnostic tester in “Guided fault finding” mode.
–  As a final step, check operation of heater and air conditioning system.
Specified torque
→ Chapter „Assembly overview - heater and air conditioning unit“
Centre console trim in footwell → General body repairs, interior; Rep. gr.68.
 

Removing and installing left temperature flap control motor -V158-, RHD vehicles

Removing and installing left temperature flap control motor -V158-, LHD vehicles
Special tools and workshop equipment required Vehicle diagnostic tester First carry out the following work: ...

Removing and installing right temperature flap control motor -V159-, LHD vehicles
Special tools and workshop equipment required Vehicle diagnostic tester First carry out the following work: ...

Other materials:

Safety markings on battery
Safety markings on battery 1. -  Fires, sparks, naked flames and smoking are prohibited when handling batteries. Avoid sparks as well as electrostatic discharge when working with cables and electrical units. Avoid short ci ...

Performing maintenance test
  WARNING It is not permissible to test or charge batteries whose colour indicator is light yellow. Do not slave/jump start the vehicle! Danger of explosion when checking and charging ...

Rear brakes
The type of brake system installed in the vehicle is indicated among other things by the corresponding PR number on the vehicle data sticker. The vehicle data sticker can be found in the spare wheel well and in the service schedule. ...

© 2016-2024 Copyright www.vwgolf.org