Volkswagen Golf Service & Repair Manual: Removing and installing headlight dipped beam bulb (dual halogen headlights)
 Note Note
| Left headlight dipped beam bulb -M29- and right headlight
dipped beam bulb -M31- are only fitted on dual halogen
headlights. |
| Removal and installation are described for the left side.
Removal and installation on the right side are carried out in
the same way. |
|
|
|
| – |
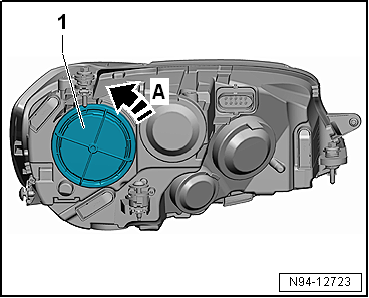
Turn housing cover -1- in
direction of arrow -A-. |
| – |
Remove housing cover -1-. |
|
|
|
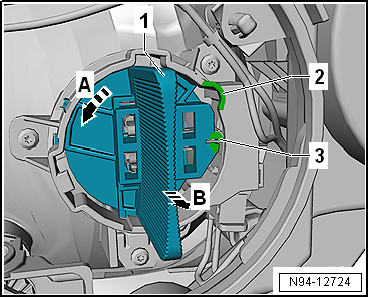
| – |
Turn bulb holder -1- in
direction of arrow -A- until
locking lug -3- is in recess
-2-. |
| – |
Pull out bulb holder -1- in
direction of arrow -B-. |
|
|
|
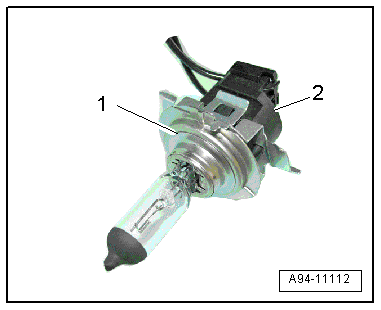
| – |
Pull bulb -1- out of bulb
holder -2-. |
| Install in the reverse order of removal, observing the
following: |
 Caution
| Risk of damage to the headlight. |
| Do not touch the glass part of the bulb with bare
fingers. Fingers leave traces of grease on the glass
bulb, which vaporise when the bulb is switched on and
cause the glass bulb to cloud over. |
| Wear, for example, clean fabric gloves when
inserting bulbs. |
| Make sure the housing cover is correctly seated when
installing. The ingress of water will lead to permanent
damage to the headlight. |
|
| – |
Insert new bulb into bulb holder. |
| – |
Insert bulb holder into reflector whilst ensuring that
locking lug points upwards and fits into recess. |
| – |
Check headlight setting and adjust headlight if necessary
→ Booklet36.1 |
|
|
|
Special tools and workshop equipment
required
Torque screwdriver -VAS 6494-
Not ...
Special tools and workshop equipment
required
Front-end hook -3370-
...
Other materials:
Removing and installing window channel
Removing and installing window channel
Note
The removal and installation sequence is only for the
left window channel. Removal and installation of the right
window channel are similar.
...
Things to note for diesel vehicles
Fig. 189 Tank flap open: misfuelling prevention
device in the fuel filler
First read and observe the introductory information
and safety warnings The fuel filler in diesel vehicles can be fitted with
a misfuelling prevention device . The misfuelling prevention device ensures that
the ...
Checklist
Always carry out the following actions for changing a bulb in the
given order :
Park the vehicle on a firm and level
surface at a safe distance from the flow of traffic.
Switch on the electronic parking brake
Braking, stopping and parking Brakes Parking .
Turn the light swit ...
© 2016-2026 Copyright www.vwgolf.org

 Removing and installing headlight range control motor -V48-/-V49-, LED
headlights
Removing and installing headlight range control motor -V48-/-V49-, LED
headlights Removing and installing headlight dipped beam bulb (LED)