Volkswagen Golf Service & Repair Manual: Removing and installing gas discharge bulb -L13-/-L14-
 WARNING
| Risk of death due to high voltage! Risk of injury
and environmental pollution! |
| Observe operation and safety notes for gas discharge
bulbs
→ Chapter. |
|
 Note Note
| Removal and installation are described for the left side.
Removal and installation on the right side are carried out in
the same way. |
| – |
Remove headlight
→ Chapter. |
|
|
|
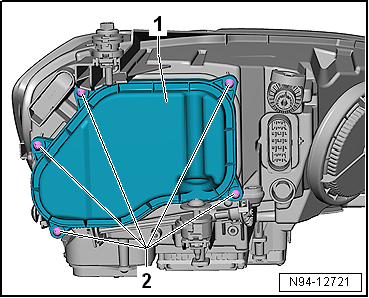
| – |
Unscrew bolts -2- from housing
cover -1-. |
| – |
Remove housing cover -1-. |
|
|
|
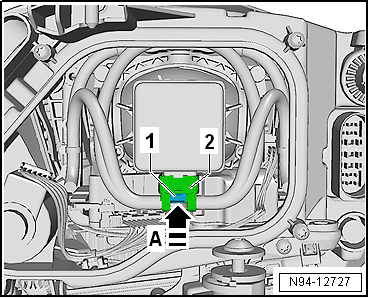
| – |
Press locking lug -1- in
direction of arrow -A- to
disconnect connector -2-. |
|
|
|
| Removing and installing side light bulb
-M1-/-M3- (dual halogen headlights) |
Note
| The left side light bulb -M1- or right side light bulb -M3-
is integrated in the left headlight main beam bulb -M30- or
right headlight main beam bulb -M32-, respectively. |
| – |
Removing and installing side light bulb -M1-/-M3-
→ Chapter „Removing and installing headlight main beam bulb
-M30-/-M32- (dual halogen headlights)“. |
|
|
|
| Removing and installing side light bulb
-M1-/-M3-, gas discharge headlights |
| The left side light bulb -M1- or right side light bulb -M3-
is integrated in the left daytime running light bulb -L174- or
right daytime running light bulb -L175-, respectively. |
| – |
Removing and installing side light bulb -M1-/-M3-
→ Chapter „Removing and installing daytime running light bulb
-L174-/-L175-, gas discharge headlights“. |
|
|
|
| Removing and installing daytime running
light bulb -L174-/-L175- (dual halogen headlights) |
Note
| The left daytime running light bulb -L174- or right daytime
running light bulb -L175- is integrated in the left headlight
main beam bulb -M30- or right headlight main beam bulb -M32-,
respectively. |
| – |
Removing and installing daytime running light bulb
-L174-/-L175-
→ Chapter „Removing and installing headlight main beam bulb
-M30-/-M32- (dual halogen headlights)“. |
|
|
|
Special tools and workshop equipment
required
Front-end hook -3370-
...
Note
Removal and installation are described for the left side.
Removal and installation on the right side are carried out in
the same way.
...
Other materials:
Contact surface cleaning set -VAS 6410-
Using contact surface cleaning set -VAS 6410-
The contact surface cleaning set -VAS 6410- allows optimal
repair quality to be achieved in the area of vehicle electrics.
The tools allow performing repair work in the area of the sensor
in wiring harnesses for t ...
Checking battery
WARNING
Danger of injury! Observe warning notices and safety
regulations
→ Chapter!
Caution
To prevent damage to ...
Introduction
This chapter contains information on the following subjects:
→ Attaching the mounts and roof carrier
→ Loading the roof carrier
The roof of the vehicle has been designed for optimum aerodynamic effect. It
is therefore no longer possible to attach conventional roof carrie ...
© 2016-2026 Copyright www.vwgolf.org

 Caution
 Removing and installing headlight main beam bulb -M30-/-M32- (LED)
 Removing and installing daytime running light bulb -L174-/-L175-, gas
discharge headlights
Removing and installing daytime running light bulb -L174-/-L175-, gas
discharge headlights