Volkswagen Golf Service & Repair Manual: Removing and installing daytime running light bulb -L174-/-L175-, gas
discharge headlights
 Note Note
| Removal and installation are described for the left side.
Removal and installation on the right side are carried out in
the same way. |
| The left daytime running light bulb -L174- or right daytime
running light bulb -L175- also serves as the left side light
bulb -M1- or right side light bulb -M3-, respectively. |
|
|
|
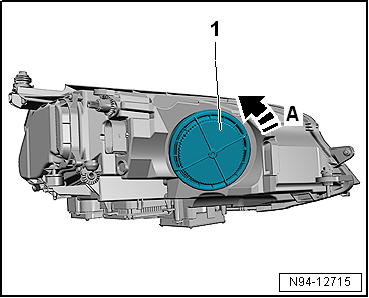
| – |
Turn housing cover -1- in
direction of arrow -A- and remove
it from headlight. |
|
|
|
| – |
Pull grip of left daytime running light bulb -L174--1-
towards rear -arrow A- to remove
left daytime running light bulb from reflector. |
| – |
Pull left daytime running light bulb -L174- out of grip. |
| Install in the reverse order of removal, observing the
following: |
 Caution
| Risk of damage to the headlight. |
| Do not touch the glass part of the bulb with bare
fingers. Fingers leave traces of grease on the glass
bulb, which vaporise when the bulb is switched on and
cause the glass bulb to cloud over. |
| Wear, for example, clean fabric gloves when
inserting bulbs. |
| Make sure the housing cover is correctly seated when
installing. The ingress of water will lead to permanent
damage to the headlight. |
|
| – |
Check headlight setting and adjust headlight if necessary
→ Booklet36.1 |
|
|

|
WARNING
Risk of death due to high voltage! Risk of injury
and environmental pollution!
Ob ...
Note
Left LED module for daytime running light and side light
-L176- and right LED module for daytime running light and side
light -L177- are onl ...
Other materials:
Tread depth and wear indicators
Fig. 202 Tyre tread: wear indicators
First read and observe the introductory information
and safety warnings Tread depth
Difficult driving situations demand the deepest possible tread depth for the
tyres and the same tread depth for the tyres on the front and rear axles. This applies
in ...
Assembly overview - gas discharge headlight with cornering light and LED
daytime running light
1 -
Headlight
Removing and installing
→ Chapter
2 -
Front turn signal bulb
Front left turn signal bulb -M5-
Front right turn signal bulb -M7-
Removing and installi ...
Stowage compartment in the front centre console
Fig. 111 In the centre console: stowage
compartment
First read and observe the introductory information
and safety warnings To open, briefly press the cover of the stowage
compartment (arrow).
To close, push the stowage compartment cover down as far as it will go.
The stowage co ...
© 2016-2026 Copyright www.vwgolf.org

 Removing and installing gas discharge bulb -L13-/-L14-
 Removing and installing LED modules for daytime running light and side light
-L176-/-L177- (does not apply for “GTE”)
Removing and installing LED modules for daytime running light and side light
-L176-/-L177- (does not apply for “GTE”)