Volkswagen Golf Service & Repair Manual: Removing and installing front entry light -W31-/-W32-
 Caution
| Danger of damage to component surfaces. |
| When using leverage tools, mask visible areas of the
component with commercially available adhesive tape. |
|
 Note Note
| Removal and installation of all entry lights are performed
in the same manner and are described only for one light. |
| The entry lights can be tested by means of the final control
diagnostic function of the respective door control unit. |
| Front left entry light -W31- |
| Front right entry light -W32- |
| Rear left entry light -W33- |
| Rear right entry light -W34- |
| Renewing entry light bulb:
→ Anchor |
| Special tools and workshop equipment
required |
|
|
|
| – |
Switch off ignition and all electrical consumers. |
|
|

|
| – |
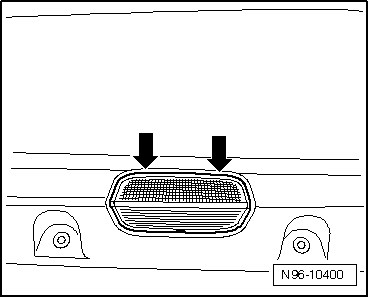
Use removal wedge -3409- or a screwdriver to carefully lever
out light. |
| – |
Release and detach connector and remove light. |
| Installation is carried out in reverse order of removal. |
| Replacing entry light bulb |
| – |
Remove front entry light
→ Anchor. |
|
|
|
| – |
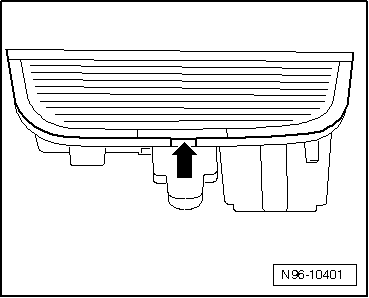
Carefully lever off lens from housing. |
|
|
|
| – |
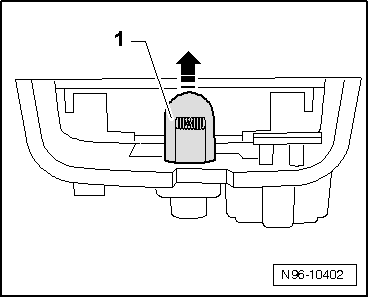
Pull bulb -1- straight upwards
out of holder. |
| Installation is carried out in reverse order of removal. |
|
|
|
| Removing and installing door warning lamp
-W30-/-W36- |
Note
| The door warning lamp and the entry light are combined to
form one component. Therefore, they can only be removed and
installed together as an entire unit. |
| – |
Removing and installing door warning lamp
→ Chapter. |
|
|
|
Removing
–
Remove front door trim panel
→ General body repairs, interior; Rep. gr.70.
...
Note
Removal and installation are described for the left side.
Removal and installation on the right side are carried out in
the same way (mirror image ...
Other materials:
Removing and installing B-pillar trim on rear door
Note
Removal and installation are described only for the left side.
Removal and installation of the right side are similar.
Removing
–
Run door window down to bottom position.
–
Pull window channel -3- in area ...
Emptying fuel tank when fuel pump is intact
Special tools and workshop equipment required
Removal wedge -3409-
Remote control -V.A.G 1348/3A-
Test instrument adapter/DSO (5-pin) -VAS 5565-
Fuel extractor -VAS 5190-
Fuel extractor -VAS 5190 A- for ...
Removing and installing engine support
Removing
–
Disconnect battery
→ Electrical system; Rep. gr.27.
–
Remove battery tray
→ Electrical system; Rep. gr.27.
–
Dra ...
© 2016-2026 Copyright www.vwgolf.org

 Removing and installing central locking SAFELOCK function warning lamp -K133
 Removing and installing door opener illumination bulb -L108-/-L109-