Volkswagen Golf Service & Repair Manual: Removing and installing fog light bulb -L22-/-L23-
 Note Note
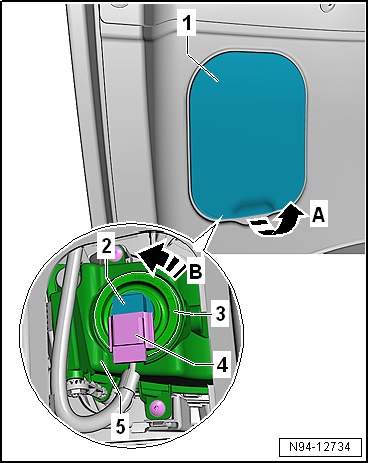
| Removal and installation are described for the left side.
Removal and installation on the right side are carried out in
the same way. |
| – |
Turn steering to right as far as stop. |
|
|
|
| – |
Lever off cover -1- in wheel
housing liner in direction of arrow -A-. |
| – |
Disconnect electrical connector -4-. |
| – |
Pull cap -3- off fog light
housing -5-. |
| – |
Turn left fog light bulb -L22--2-
in direction of arrow -B- and pull
it out of fog light housing -5-. |
| – |
Pull cap -3- off left fog light
bulb -L22--2-. |
| Install in the reverse order of removal, observing the
following: |
 Caution
| Risk of damage to the headlight. |
| Do not touch the glass part of the bulb with bare
fingers. Fingers leave traces of grease on the glass
bulb, which vaporise when the bulb is switched on and
cause the glass bulb to cloud over. |
| Wear, for example, clean fabric gloves when
inserting bulbs. |
| Make sure cover cap is correctly seated when
installing. The ingress of water will lead to permanent
damage to the headlight. |
|
| – |
Slide cap -3- onto left fog
light bulb -L22--2-. |
| – |
Push left fog light bulb -L22--2-
into fog light housing. |
| – |
Turn left fog light bulb -L22--2-
clockwise to stop. |
| – |
Check headlight setting and adjust headlight if necessary
→ Booklet36.1 |
|
|
 |
Note
Removal and installation are described for the left side.
Removal and installation on the right side are carried out in
the same way.
...
Other materials:
Winter tyres
First read and observe the introductory information
and safety warnings In winter road conditions, winter tyres will considerably
improve the car's handling. The design of summer tyres (width, rubber compound,
tread pattern) gives less grip on ice and snow. Volkswagen urgently recommends ...
Radiator fan control unit -J293
Note
Available in various designs, sometimes separately.
This control unit switches the magnetic clutch and thus the
air conditioner compressor on and off. It controls the radiator
fan, an ...
Removing and installing remote control receiver for auxiliary coolant heater
-R149-, Golf Variant
Note
If the remote control receiver for auxiliary coolant heater
-R149- is renewed, the remote control receiver for auxiliary
coolant heater -R149- needs to be adapted to the auxiliary and
supplementary heater using the vehicle diagnostic tester ...
© 2016-2026 Copyright www.vwgolf.org

 Removing and installing fog light, GTI and GTD