Volkswagen Golf Service & Repair Manual: Removing and installing ignition coils with output stage
| Special tools and workshop equipment
required |
|
|
|
 Note Note
| The ignition coils are easier to remove when the engine is
warm. The grease used during installation of the ignition coils
makes it easier to remove them and the spark plug connectors
when the engine is warm. |
| Ignition coils with output stage and spark plug connectors
are available individually for repairs
→ ETKA (Electronic Parts Catalogue |
| Ignition coils “cyl. 2, 3 and 4”: |
|
|
|
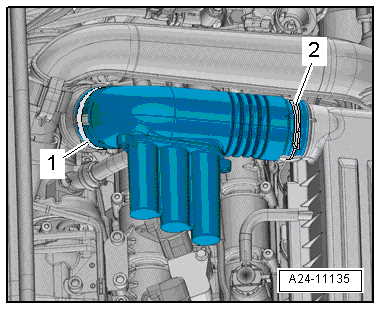
| – |
Release hose clips -1- and
-2-, and remove air pipe. |
| All ignition coils (continued): |
|
|
|
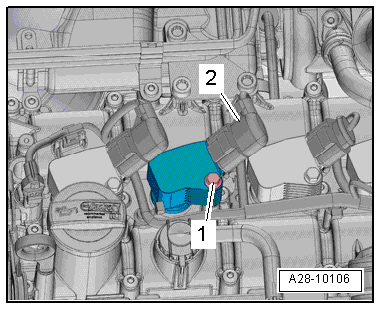
| – |
Disconnect electrical connector -2-. |
|
|
|
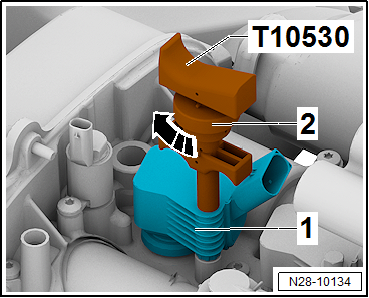
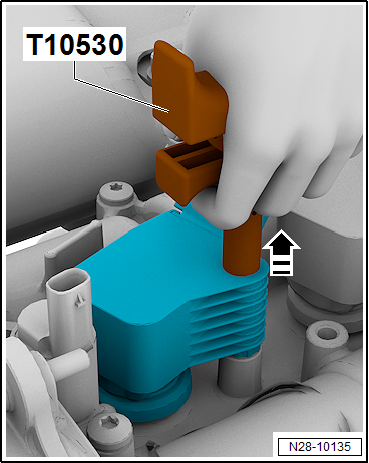
| – |
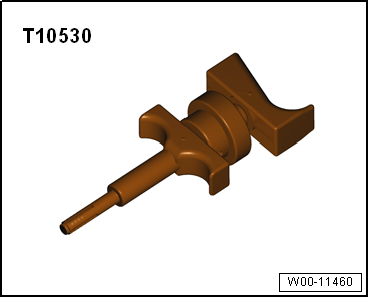
Push puller -T10530- into hole in ignition coil
-1- to stop. |
| – |
Tighten knurled nob -2- in
-direction of arrow-. |
|
|
|
| – |
Pull ignition coil out of camshaft housing in
-direction of arrow- using puller
-T10530-. |
Note
| Ignition coil with output stage and spark plug connectors
are available individually for repairs
→ ETKA (Electronic Parts Catalogue |
| The spark plug connectors are removed from the ignition
coils by hand. |
| Installation is carried out in the reverse order; note the
following: |
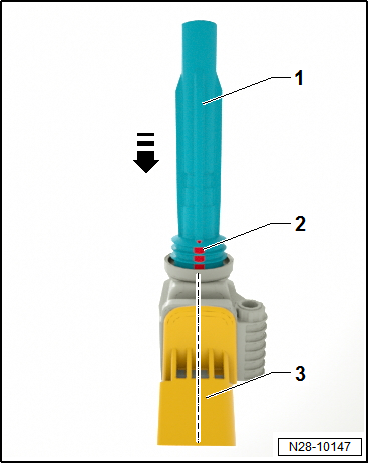
| – |
Slide spark plug connector -1-
by hand onto ignition coil as far as stop. |
|
|
|
| The vent drilling -2- must be
centred relative to connector housing -3-
while doing so. |
| – |
Insert all spark plugs with spark plug connector loosely
into spark plug recess. |
| – |
Align ignition coils with connectors and simultaneously push
all connectors onto ignition coils. |
| – |
Press ignition coils evenly onto spark plugs by hand (do not
use tool). |
| → Chapter „Assembly overview - ignition system“ |
|
|
|
1 -
Bolt
The specified torque influences the function of the knock sensor.
20 Nm
2 -
Knock sensor 1 -G61-
...
Removing
–
Remove air conditioner compressor from bracket and tie up
→ Heating, air conditioning; Rep. gr.87.
...
Other materials:
Refrigerant circuit with expansion valve
A- low-pressure side of the refrigerant circuit.
B- high-pressure side of the refrigerant circuit.
Component
Overall
state of the refrigerant
Pressure (in bar)
Temperature
in deg ...
Changing the bulb in the number plate light
Fig. 241 In the rear bumper: number plate
light
Fig. 242 Number plate light: removing the
bulb holder
First read and observe the introductory information
and safety warnings
The actions should only be carried out in the specified order:
1. ...
Removing and installing turn signal
Special tools and workshop equipment
required
Torque wrench -V.A.G 1783-
Note
Removal and installation are described for the left side.
Removal and insta ...
© 2016-2026 Copyright www.vwgolf.org

 Assembly overview - ignition system
 Removing and installing knock sensor 1 -G61