Volkswagen Golf Service & Repair Manual: Removing and installing engine mountings
| – |
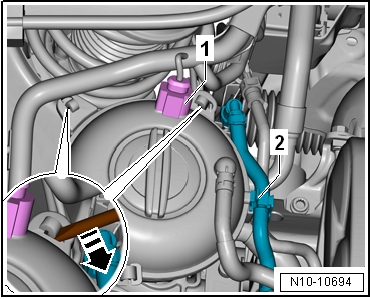
Disconnect electrical connector -1-. |
|
|
|
| – |
Move clear hose -2- from
activated charcoal filter. |
| – |
Using a screwdriver, release fasteners
-arrow- and move coolant expansion tank to one side. |
| – |
Supporting engine in installation position
→ Chapter „Supporting engine in installation position“ |
|
|
|
| – |
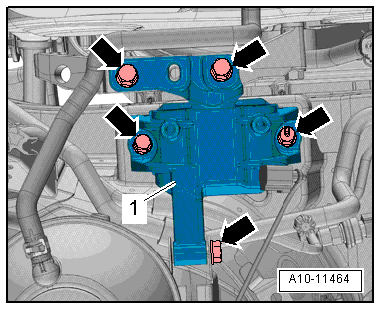
Unscrew bolts -arrows- and
remove engine mounting -1-. |
| Installation is carried out in the reverse order; note the
following: |
| – |
Checking adjustment of assembly mountings
→ Chapter. |
| → Chapter „Assembly overview - assembly mountings“ |
|
|
|
Special tools and workshop equipment
required
Support bracket -10 - 222 A-
...
Removing
–
Release hose clips -1- and
-2-, and remove air pipe.
– ...
Other materials:
Vents
Fig. 184 In the dash panel: vents
First read and observe the introductory information
and safety warnings Vents
The vents should be left open to ensure that the vehicle interior is sufficiently
heated, ventilated and cooled.
Turn the relevant thumb wheel (magnified view) in the req ...
Windscreen and rear window washer system
Pull the two coupling sections apart (no securing device) to
loosen the connection.
–
To secure the connection, push the two coupling sections
together, until you hear and feel them engage.
...
Removing and installing dash panel end cover
Note
Removal and installation is described for the dash panel
end cover on driver side. Follow same instructions for the front
passenger side as appropriate.
Special tools and workshop equipment
required
&n ...
© 2016-2026 Copyright www.vwgolf.org

 Supporting engine in installation position
 Removing and installing gearbox mounting