Volkswagen Golf Service & Repair Manual: Layout - infotainment system, Discover Pro version
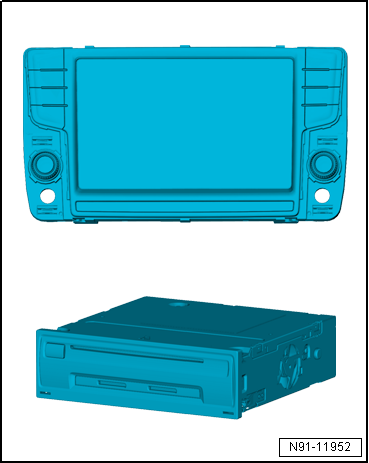
| Control unit 1 for information electronics -J794- |
| Display unit for control device of front display and
information control panel -J685- |
| SD memory card reader: 2 SD card slots |
| Connection for external multimedia devices |
| 8-inch multicolour touch screen (approach detection) |
| 4 x 20 watts + 2 x 35 watts output power |
| Integrated Dual DAB tuner for digital radio reception |
| SDARS for vehicles in North America and Canada |
| Integrated diversity function |
| 3 D navigation system with GPS satellite receiver |
| SD memory card reader with 2 SD card slots |
| AUX IN via jack connector |
| Support for multifunction steering wheel |
| Self-diagnosis, including loudspeaker diagnosis |
| Bluetooth hands-free system |
| Speed dependent volume control (GALA) |
| Speed dependent dynamic compression (GADK) |
| Available as an option (Car Net): |
 Note Note
| When dealing with complaints it is absolutely necessary to
understand the functions and operation of the infotainment
system. |
| Additional information can be found in the
→ Operating manual. |
| Other systems in the vehicle are connected via CAN bus
(infotainment) and data bus diagnostic interface -J533-. |
| Fault finding is done via Guided fault
finding
→ Vehicle diagnostic tester. |
|
|
|
| Infotainment system overview |
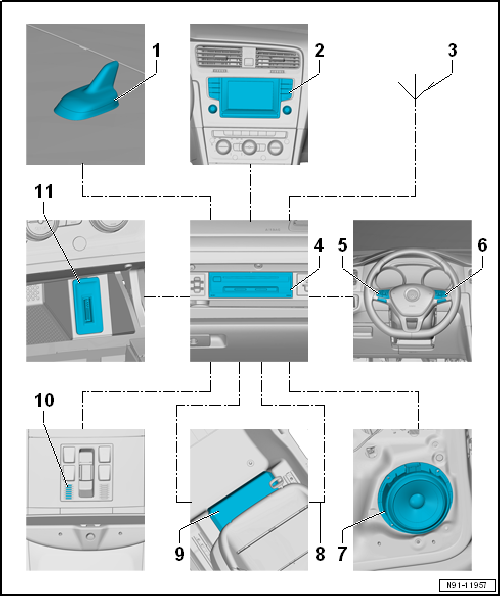
| 2 - |
Display unit for control device of front display and information
control panel -J685- |
| 4 - |
Control unit 1 for information electronics -J794- |
| 5 - |
Multifunction buttons on left in steering wheel -E440- |
| 6 - |
Multifunction buttons on right in steering wheel -E441- |
| 9 - |
Digital sound package control unit -J525- |
| 10 - |
Telephone microphone -R38- |
| In front interior light -W1-. |
| 11 - |
Connection for external multimedia devices |
| Apart from the CAN bus, the optical data bus “MOST bus” is
used. |
| Optical fibre conductors are used as “connecting cables”.
For protection purposes, optical fibre conductors are run
through corrugated pipes. |
| As far as possible, renew the complete optical fibre
conductor. |
| Make sure that the cross-cut ends of connectors are not
dirty. |
|
|
|
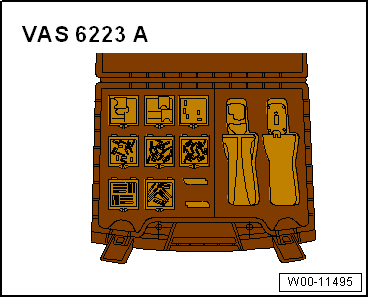
| If connectors are separated, attach protective cap for
cable-set connector -VAS 6223/9-. |
| When routing the optical fibre conductor, make sure that the
minimum bending radius of 25 mm is observed. Optical fibre
conductors must not be kinked or pinched. |
| Optical fibre conductors
→ Electrical System, General Information; Rep. gr.97 |
|
|
|
Control unit 1 for information electronics -J794-
Display unit for control device of front display and
information control panel -J685-
...
1 -
Multifunction buttons in steering wheel
Multifunction buttons on left in steering wheel -E440-
Multifunction buttons on right in steeri ...
© 2016-2026 Copyright www.vwgolf.org

 Layout - infotainment system, Composition Media and Discover Media version
 Overview of fitting locations - infotainment system