Volkswagen Golf Service & Repair Manual: Removing and installing door inner seal
| During production, a sealant is applied to the door inner
seals, which are then placed on the door flange and rolled on. |
 Note Note
| |
When removing the seal, the sealant is distributed across
the inside of the seal. The sides are bent upwards slightly when
this is being done. If the seal is then refitted, sealing and
firm seating are no longer guaranteed. |
| |
Therefore, each seal that is completely removed must be
renewed with a so-called “tap-on seal”. |
| |
If a seal has been partially removed, squeeze sides of
seal together before installing. |
| |
Removal and installation are described only for the left
door inner seal. The right side is similar. |
| |
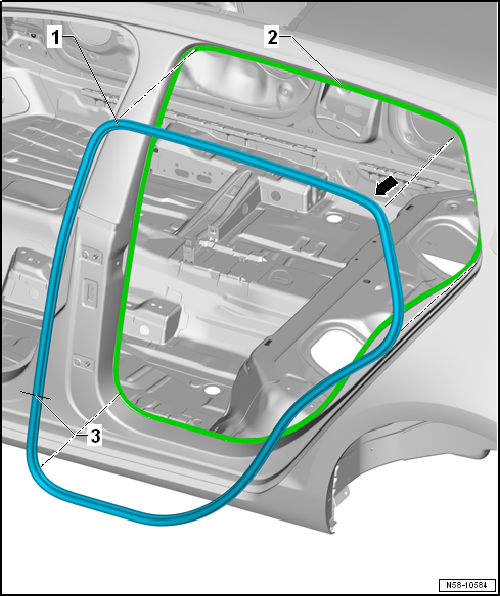
For reasons of clarity, the rear door is shown removed. |
|
|
|
| – |
Remove sill panel moulding
→ General body repairs, interior; Rep. gr.70. |
| – |
To remove door inner seal, remove pillar trims as required
→ General body repairs, interior; Rep. gr.70. |
| – |
Pull door inner seal -1- off body
flange -2-. |
Note
| Do not kink vulcanised point -2-. |
| – |
Start installing door inner seal -1- at
top radius of door aperture -arrow b-. |
| – |
Align vulcanised point -3- between
hinges. |
| – |
Install pillar trims
→ General body repairs, interior; Rep. gr.70. |
| – |
Install sill panel strip
→ General body repairs, interior; Rep. gr.70. |
Special tools and workshop equipment
required
Note
Removal and installation are only described ...
Other materials:
Fitting a bicycle carrier on the mechanically positioned ball coupling
First read and observe the introductory information
and safety warnings The maximum permitted load on a bicycle carrier mounted
on the ball coupling is 80 kg at a distance of 300 mm. This distance
refers to the gap between the centre of gravity of the bicycle carrier (complete
with bicycle ...
Checking seat belts
WARNING
The seat belt system must be inspected
systematically after every accident! If damage is
determined at any of the points to be checked, customer
must be informed regarding necessity of changing belt ...
Removing and installing C-pillar trim, saloon
Note
Removal and installation are described for the left
vehicle side. Follow same instructions for the right side as
appropriate.
Special tools and workshop equipment
required
...
© 2016-2026 Copyright www.vwgolf.org

 Removing and installing door arrester
 Door components