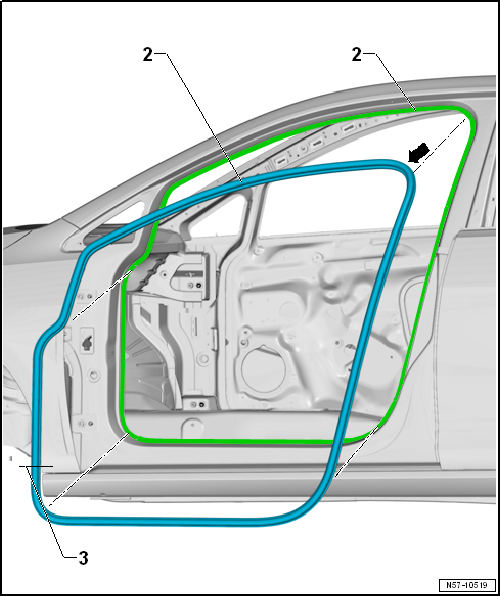
Volkswagen Golf Service & Repair Manual: Removing and installing door inner seal
| During production, a sealant is applied to the door inner
seals, which are then placed on the door flange and rolled on. |
 Note Note
- When removing the seal, the sealant is distributed across the
inside of the seal. The sides are bent upwards slightly when this is
being done. If the seal is then refitted, sealing and firm seating
are no longer guaranteed.
- Therefore, each seal that is completely removed must be
renewed with a so-called “tap-on seal”.
- If a seal has been partially removed, squeeze sides of seal
together before installing
- Removal and installation are described only for the left door
inner seal. The right side is similar.
- For reasons of clarity, the front door is shown in removed
state
|
|
|
| – |
Remove sill panel moulding
→ General body repairs, interior; Rep. gr.70. |
| – |
To remove door inner seal, remove pillar trims as required
→ General body repairs, interior; Rep. gr.70. |
| – |
Pull door inner seal -1- off body
flange -2-. |
| – |
Start installing door inner seal -1- at
top radius of door aperture -arrow b-. |
| – |
Align vulcanised point -3- above lower
hinge. |
| – |
Install pillar trims
→ General body repairs, interior; Rep. gr.70. |
| – |
Install sill panel strip
→ General body repairs, interior; Rep. gr.70. |
Note
Only the left side is shown. The right side is similar
After renewal of A-pillar, the specified torque for bolts
-2 and 5- as well as for
-14 and 17- changes
...
Special tools and workshop equipment
required
Door alignment tool -3320-
Universal joint for 3320 -3320/1
Bit for 3320 -3320/2-
Bit for 3320 -3 ...
Other materials:
Removing and installing control unit 1 for information electronics -J794-
Special tools and workshop equipment
required
Radio release tool -T10057-
Protective cap for wiring harness connector -VAS 6223/ ...
Assembly overview - brake pedal, RHD vehicles
The brake pedal travel must not be restricted by additional floor
coverings.
Note
Do not lubricate or grease the pivot pin. The pivot pin must remain
dry.
1 -
Bolt
20 Nm
2 -
Mounting b ...
Undulations
Radial depressions are slight concavities in the tyre
sidewall.
They run from the bead towards the shoulder of the tyre.
These parts appear in the figure
→ Fig..
The cause is the accumulation of material ...
© 2016-2026 Copyright www.vwgolf.org

 Assembly overview - door
 Removing and installing door