Volkswagen Golf Service & Repair Manual: Removing and installing door
| Special tools and workshop equipment
required |
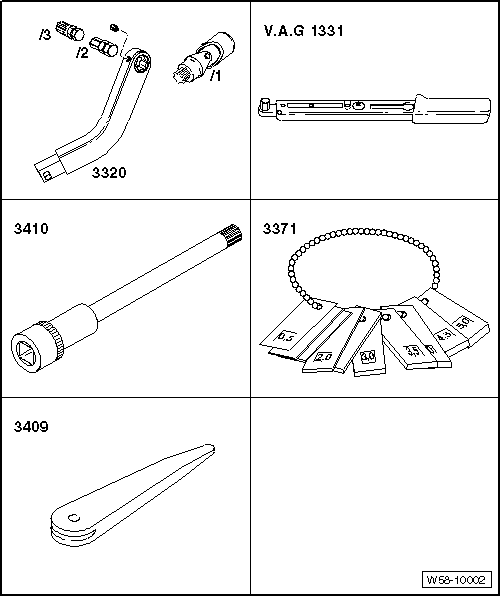
- Door alignment tool -3320-
- Universal joint for 3320 -3320/1
- Bit for 3320 -3320/2-
- Bit for 3320 -3320/3-
- Torque wrench -V.A.G 1331-
- Socket -3410-
- Setting gauge -3371-
|
|
|
 Note
| The removal and installation sequence is for the front left
door. Removal and installation of the front right door are
similar. |
|
|

Removal wedge -3409- |

| – |
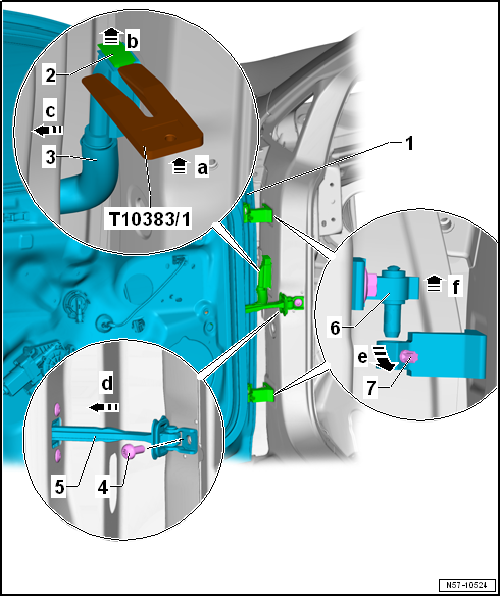
Press wedge -T10383/1- between bellows -3-
and locking mechanism -arrow a-. |
| – |
Push locking mechanism upwards -2- with
wedge -T10383/1--arrow b- and separate
electrical connector -3- from coupling
station -arrow c-. |
| – |
Undo screws -7- from hinges. |
| – |
Unscrew bolt -4- for door retaining
strap -5-. |
| – |
Push door arrester -6- inwards
-arrow d-. |
| – |
Lift front door -1- upwards
-arrow f- so that hinge
-6- is released from hinges
-7-. |

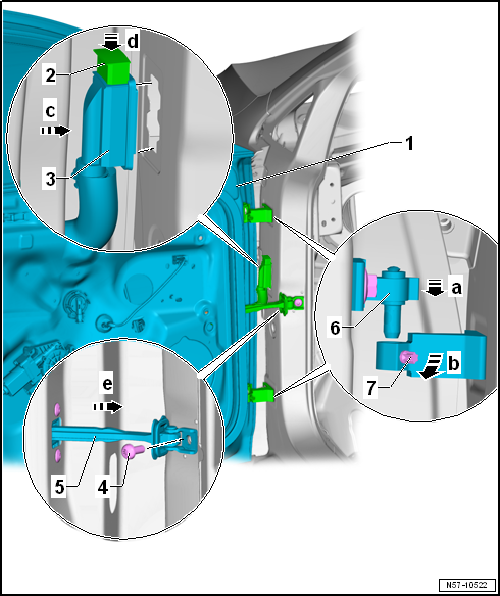
| Install in reverse order of removal. To this end, the following
should be observed: |
 Caution Caution
| Prior to installing the front door, the door
retaining strap must be folded towards the inside of the vehicle
in order to avoid damage to the paintwork. |
|

Note
| After door installation the hinge arms must be flush one above the
other. |
| – |
Adjust front door -1-
→ Chapter. |
| – |
Observe front door shut lines -1-
→ Rep. gr.00. |
| Door arrester and hinges
→ Chapter „Assembly overview - door“ |
During production, a sealant is applied to the door inner
seals, which are then placed on the door flange and rolled on.
Note
When removing ...
Special tools and workshop equipment
required
Door alignment tool -3320-
Universal joint for 3320 -3320/1-
Bit for 3320 -3320/2-
Bit for 3320 - ...
Other materials:
Removing and installing inner door handle
The inner door handle is clipped into trim panel.
Note
Removal and installation are described for the trim panel
on driver side. Follow same instructions for the front passenger
side as appropriate.
Removi ...
Assembly overview - front brakes PC57 and C60
Note
After every brake pad change, depress brake pedal firmly
several times with vehicle stationary, so that brake pads are
properly seated in their normal operating position.
Use the brake filling and bleeding equip ...
Brake fluid
Fig. 144 In the engine compartment: cap
on the brake fluid container
First read and observe the introductory information
and safety warnings Brake fluid will gradually absorb water from the surrounding
air. The brake system will be damaged if there is too much water in the brake fluid.
T ...
© 2016-2026 Copyright www.vwgolf.org

 Note
Note

 Caution
 Note
Note Removing and installing door inner seal
 Adjusting door
