Volkswagen Golf Owners Manual: Rain sensor

Fig. 89 Windscreen wiper lever: setting the rain sensor ①
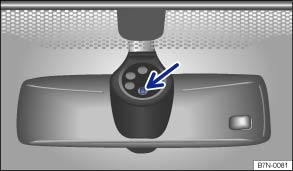
Fig. 90 Sensitive surface of the rain sensor
 First read and observe the introductory information
and safety warnings
First read and observe the introductory information
and safety warnings When the rain sensor is activated, it automatically controls the frequency of the wiper intervals, depending on the amount of rain . The sensitivity of the rain sensor can be adjusted manually. Manual wipe .
The automatic wipe function can be activated and deactivated using the


 button and the
  and
Mirror and wipers function buttons in the infotainment system .
and
Mirror and wipers function buttons in the infotainment system .
If the rain sensor deactivated, intervals will be set in levels.
Push the lever to the desired position :
 Deactivates the rain sensor.
  Rain sensor is active – automatic wipe
when necessary.
Rain sensor is active – automatic wipe
when necessary. 
Adjusting the sensitivity of the rain sensor:
- Switch to the right – high sensitivity.
- Switch to the left – low sensitivity.
The rain sensor will remain active after the ignition is switched off and back on again and will function again if the windscreen wiper lever is in position Ⓑ and if the vehicle is travelling at speeds higher than 4 km/h (2 mph).
Changes to the functioning of the rain sensor
Possible causes for faults and misinterpretations concerning the sensitive surface of the rain sensor include:
- Damaged wiper blades: a film of water or smears caused by damaged wiper blades can increase the time the wipers are switched on, can shorten the length of the intervals between wipes or cause the wipers to run continuously.
- Insects: insects hitting the windscreen surface can cause the wipers to be activated.
- Salt deposits: in winter, salt deposits can cause the wiper to continue to wipe the windscreen when it is almost dry.
- Soiling: dry dust, wax, windscreen coatings (lotus effect) or detergent deposits (automatic car wash) can cause the rain sensor to become less sensitive and react too slowly or even not at all.
- Crack in the windscreen: when the windscreen is impacted by a stone, a wash cycle is triggered if the rain sensor is on. The rain sensor will then register the reduction in sensitivity of the surface and adjust accordingly. The size of the crack could affect the way in which the sensor activates the wipers.

 WARNING
- If necessary, switch on the windscreen wiper manually if the water on the windscreen restricts the field of vision.

Clean the sensitive surface of the rain sensor (arrow) at regular intervals and check the wiper blades for damage.
We recommend that you use an alcohol-based glass cleaner to remove wax and polish.
 Service position for the front windscreen wipers
Fig. 88 Wiper blades in service position
First read and observe the introductory information
and safety warnings The windscreen wiper arms can be lifted off the windscreen
when in the service ...
 Checking and refilling the windscreen washer fluid level
Fig. 91 In the engine compartment: cap
of washer fluid reservoir
First read and observe the introductory information
and safety warnings The windscreen washer fluid level should be checked reg ...
Other materials:
Removing and installing steering column electronics control unit -J527-,
Kostal
Note
Airbag coil connector and return ring with slip ring -F138-
is integrated in steering column electronics control unit
-J527-.
When renewing the control unit, select “Renew” function for
the respec ...
Checking inertia reel (locking mechanism)
The inertia reel has two locking functions.
The first locking function is triggered by the belt being
jerked out of the reel (belt extension acceleration).
Test 1
–
Pull belt o ...
Upper section of the centre console
Fig. 7 Overview of the upper section of
the centre console
Key for :
Indicator lamp for the front passenger
front airbag switch-off function
Vent –
–
Infotainment system (factory-fitted)
Operating display
Radio ⇒ BookletRadio,
N ...
