Volkswagen Golf Service & Repair Manual: Overview of fitting locations – controls in roof trim
 Note
Note
| The illustration shows fitting locations for LHD vehicles. Fitting
locations for RHD vehicles are similar. |
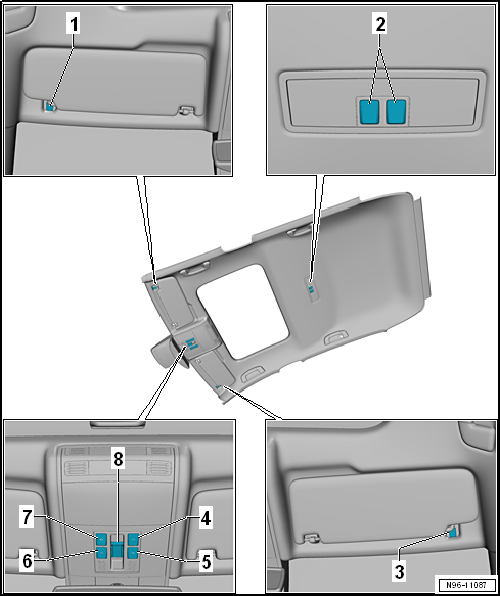
| 1 - |
Driver vanity mirror contact switch -F147- |
| The vanity mirror contact switch is as integral part of the sun
visor bracket and cannot be renewed individually if defective. |
| Removing and installing
→ Chapter |
| 2 - |
Button for rear interior light -W43- |
| Installed in rear interior light -WX2- |
| Removing and installing
→ Chapter |
| 3 - |
Front passenger vanity mirror contact switch -F148- |
| The vanity mirror contact switch is as integral part of the sun
visor bracket and cannot be renewed individually if defective. |
| Removing and installing
→ Chapter |
| 4 - |
Button for rear interior light -W43- |
| Installed in front interior light -WX1- |
| Removing and installing
→ Chapter |
| 5 - |
Front right reading light button -E634- |
| Installed in front interior light -WX1- |
| Removing and installing
→ Chapter |
| 6 - |
Button for front interior light -W1- |
| For switching front interior light -W1- on and off |
| Removing and installing
→ Chapter |
| 7 - |
Button for front interior light -W1- |
| For switching front interior light -W1- on and off by means of door
contact switches |
| Installed in front interior light -WX1- |
| Removing and installing
→ Chapter |
| 8 - |
Sunroof button -E325- |
| Installed in front interior light -WX1- |
| Removing and installing
→ Chapter |
| Specified torque for bolts : 0.65 Nm |
Note
The illustration shows fitting locations for LHD vehicles. Fitting
locations for RHD vehicles are similar.
1 -
Starter button -E378-
...
Note
The removal and installation procedures are described for
LHD vehicles. Removal and installation for RHD vehicles are
similar.
...
© 2016-2026 Copyright www.vwgolf.org


 Overview of fitting locations – controls in centre console
 Removing and installing rotary light switch -EX1-