Volkswagen Golf Service & Repair Manual: Removing and installing rotary light switch -EX1-
 Note
Note
| The removal and installation procedures are described for
LHD vehicles. Removal and installation for RHD vehicles are
similar. |
| – |
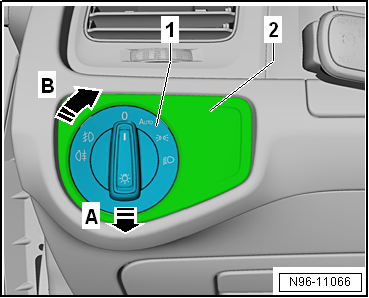
Turn light switch to “0” position. |
|
|
|
| – |
Press in rotary knob -1- of
rotary light switch -EX1- opposite direction of arrow
-A- and turn it opposite direction
of arrow -B-. |
| – |
Hold rotary knob -1- in this
position. |
| – |
Pull entire rotary light switch -EX1- out of dash panel in
direction of arrow -A-. |
|
|
|
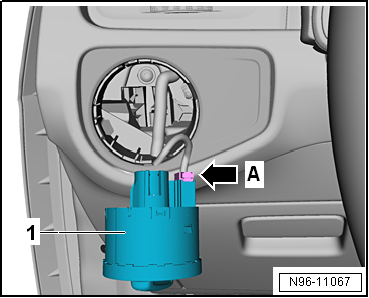
| – |
Disconnect connectors -arrow A-
and remove rotary light switch -EX1--1-. |
| Install in the reverse order of removal, observing the
following: |
|
|
|
| – |
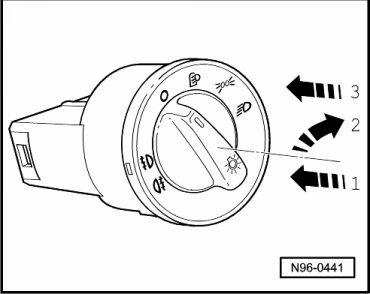
Hold rotary light switch -EX1- and press in rotary knob of
light switch -1- while
simultaneously turning it clockwise -2-. |
| – |
Hold rotary knob in this position and insert rotary light
switch -EX1- into dash panel -3-. |
| – |
Turn the rotary grip to position “0” in order to ensure that
the switch engages in the dash panel. |
|
|
|
Note
The illustration shows fitting locations for LHD vehicles. Fitting
locations for RHD vehicles are similar.
1 -
Driver vanity mirror contact ...
Note
The removal and installation procedures are described for
LHD vehicles. Removal and installation for RHD vehicles are
similar.
...
© 2016-2026 Copyright www.vwgolf.org

 Overview of fitting locations – controls in roof trim
 Removing and installing headlight range control regulator -E102-