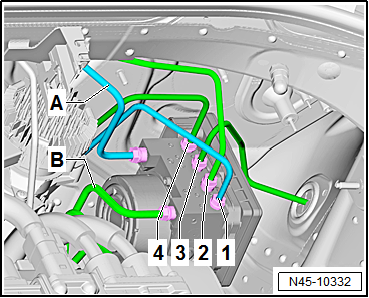
Volkswagen Golf Service & Repair Manual: Connecting brake lines to hydraulic unit, RHD vehicles
| 1 - |
From hydraulic unit to rear left brake caliper. |
| - |
Identification: Ш 5.25 mm and flare nut with thread M 10 x 1 |
| 2 - |
From hydraulic unit to front right brake caliper. |
| - |
Identification: Ш 5.25 mm and flare nut with short thread M
12 x 1 |
| 3 - |
From hydraulic unit to front left brake caliper. |
| - |
Identification: Ш 5.25 mm and flare nut with thread M 10 x 1 |
| 4 - |
From hydraulic unit to rear right brake caliper |
| - |
Identification: Ш 5.25 mm and flare nut with short thread M
12 x 1 |
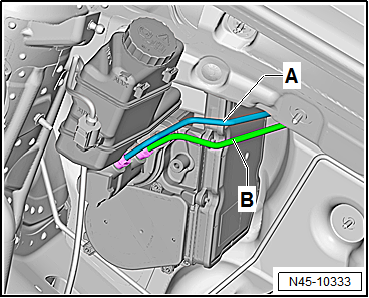
| A - |
From hydraulic unit to primary piston circuit of brake
master cylinder. |
| - |
Identification: Ш 6 mm and flare nut with thread M 12 x 1 |
| B - |
Hydraulic unit to brake system pressure accumulator -VX70- |
| - |
Identification: Ш 6 mm and flare nut with thread M 12 x 1 |
|
|
|
| On brake master cylinder: |
|
|
|
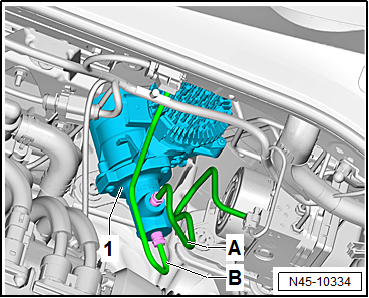
| On brake system pressure accumulator -VX70-: |
| A - |
Brake system pressure accumulator -VX70- to hydraulic unit |
| - |
Identification: Ш 6 mm and flare nut with thread M 12 x 1 |
| B - |
Brake system pressure accumulator -VX70- to secondary piston
circuit of brake master cylinder |
| - |
Identification: Ш 6 mm and flare nut with thread M 12 x 1 |
|
|
|
On hydraulic unit:
1 -
From hydraulic unit to rear right brake caliper
-
Identification: Ш 5.25&nb ...
Special tools and workshop equipment
required
ESD workplace -VAS 6613-
Torx bit T25
I ...
© 2016-2026 Copyright www.vwgolf.org

 Connecting brake lines to hydraulic unit, LHD vehicles
 Separating control unit from hydraulic unit