Volkswagen Golf Service & Repair Manual: Connecting brake lines to hydraulic unit, LHD vehicles
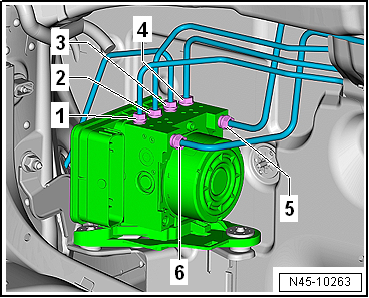
| 1 - |
From hydraulic unit to rear right brake caliper |
| - |
Identification: Ш 5.25 mm and flare nut with short thread M
12 x 1 |
| 2 - |
From hydraulic unit to front left brake caliper. |
| - |
Identification: Ш 5.25 mm and flare nut with thread M 10 x 1 |
| 3 - |
From hydraulic unit to front right brake caliper. |
| - |
Identification: Ш 5.25 mm and flare nut with short thread M
12 x 1 |
| 4 - |
From hydraulic unit to rear left brake caliper. |
| - |
Identification: Ш 5.25 mm and flare nut with thread M 10 x 1 |
| 5 - |
From hydraulic unit to secondary piston circuit of brake
master cylinder. |
| - |
Identification: Ш 6 mm and flare nut with thread M 12 x 1 |
| 6 - |
From hydraulic unit to primary piston circuit of brake
master cylinder. |
| - |
Identification: Ш 6 mm and flare nut with thread M 12 x 1 |
| → Chapter „Assembly overview - brake servo/brake master
cylinder, LHD vehicles“ |
| → Chapter „Assembly overview - control unit and hydraulic unit,
LHD vehicles“ |
|
|
|
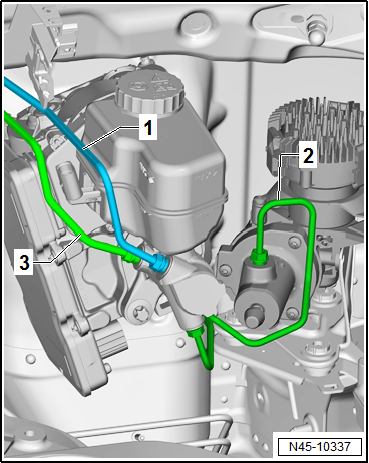
| Tandem brake master cylinder and brake system pressure
accumulator -VX70-: |
| 1 - |
Secondary piston circuit of brake master cylinder to ABS
hydraulic unit -N55-. |
| 2 - |
Brake system pressure accumulator -VX70- to brake master
cylinder |
| 3 - |
Primary piston circuit of brake master cylinder to ABS
hydraulic unit -N55-. |
| → Chapter „Assembly overview – Brake system pressure accumulator
-VX70-, LHD vehicles“ |
|
|
|
Special tools and workshop equipment required
Torque wrench -V.A.G 1331-
Torque wrench -V.A.G 1410-
Brake pedal depressor -V.A.G 1869/2- ...
On hydraulic unit:
1 -
From hydraulic unit to rear left brake caliper.
-
Identification: Ш 5. ...
Other materials:
Installing brackets for parking aid system
Special tools and workshop equipment
required
Installation tool for PDC bracket -VAS 6614-
Materials
Cartridge gun ...
Paintwork system for plastic components
Issue 03.2010
This universal system allows simple and reliable painting of
all external plastic components in standard applications.
(Synthetic types: PP, EPDM, ABS, PC, PPO, PBTP, UP-GF, PA, PVC,
R-TPU, PUR). This technical data sheet i ...
Removing and installing locking mechanism for rear seat backrest
Special tools and workshop equipment
required
Torque wrench -V.A.G 1331
Removing
–
Remove trim for locking mechanism
...
© 2016-2026 Copyright www.vwgolf.org

 Removing and installing control unit and hydraulic unit, RHD vehicles
 Connecting brake lines to hydraulic unit, RHD vehicles