Volkswagen Golf Service & Repair Manual: Separating control unit from hydraulic unit
| Special tools and workshop equipment
required |
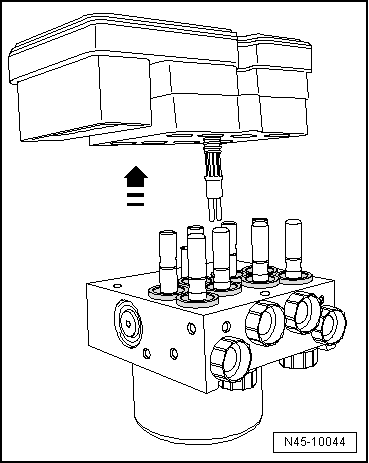
| If a control unit is defective, separate it from the
hydraulic unit and renew only the control unit. |
| If the hydraulic unit is defective, the hydraulic unit must
be renewed together with the control unit. |
| To separate the control unit from the hydraulic unit, the
ESP unit must be removed first. |
| Return flow pump must not be separated from hydraulic unit. |
| Printed circuit board is exposed when control unit is
removed. |
| Neither moisture nor particles of dirt may enter the
interior of the control unit. |
| Avoid electrostatic charge! |
| This electrostatic charge can cause malfunctions if you
touch electric components. |
| – |
Before working on electric components, touch an earthed
object, ESD workplace -VAS 6613-. Do not directly touch
connector contacts or electronic components. |
| – |
Lay down hydraulic unit together with control unit on ESD
workplace -VAS 6613-. |
| – |
Unscrew the 3 Torx bolts from control unit and lay them
aside immediately (to avoid interchanging with the new Torx
bolts). |
| – |
Set hydraulic unit with control unit facing upwards on ESD
workplace -VAS 6613-. |
|
|
|
| – |
Taking care not to cant control unit, pull it off hydraulic
unit. |
| – |
Cover control unit solenoids with a lint-free cloth. |
| – |
Check cleanliness of hydraulic unit sealing surface; clean
with methylated spirits and a lint-free cloth if necessary. |
| The sealing surface of the hydraulic unit may not be worked
with a file, metal scraper, sandpaper or similar. |
| If the sealing surface of the hydraulic unit is damaged
(e.g. scoring, scratches), the hydraulic unit must be renewed
together with the control unit. |
| The seal of the control unit may not be pulled out or
raised. |
| The seal of the control unit cannot be renewed. |
|
|
|
On hydraulic unit:
1 -
From hydraulic unit to rear left brake caliper.
-
Identification: Ш 5. ...
Special tools and workshop equipment
required
ESD workplace -VAS 6613-
Torque screwdriver -V.A.G 1624-
...
Other materials:
Driving notes on towing
First read and observe the introductory information
and safety warningsTowing requires some experience, especially when using
a tow rope. Both drivers should be familiar with the technique required for towing.
Inexperienced drivers should not attempt to tow.
When driving, ensure that you do ...
Removing and installing front body acceleration senders -G341-/-G342-
Special tools and workshop equipment
required
Torque wrench -V.A.G 1410-
Removing
–
Pull seal off entire length of plenum chamber cover.
...
Tyre storage
Storage room
The conditions have to be:
dark
dry,
cool and
ventilated
in the tyre storage room.
...
© 2016-2026 Copyright www.vwgolf.org

 Connecting brake lines to hydraulic unit, RHD vehicles
 Fitting control unit to hydraulic unit