Volkswagen Golf Service & Repair Manual: Assembly overview – Brake system pressure accumulator -VX70-, LHD vehicles
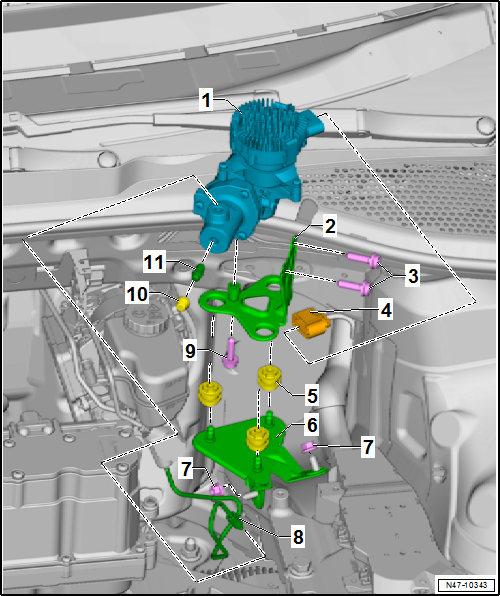
| 1 - | Brake system pressure accumulator -VX70- |
| Removing and installing → Chapter |
| 2 - | Bracket |
| Check for secure seating after installing |
| 3 - | Bolt |
| 8 Nm |
| 4 - | Electrical connector |
| 5 - | Rubber damper |
| Do not press rubber dampers out of bracket when installing bracket. |
| 6 - | Bracket |
| 7 - | Hexagon nut |
| 20 Nm |
| 8 - | Brake line |
| To brake master cylinder |
| With thread M10 x 1 |
| 14 Nm |
| 9 - | Bolt |
| 8 Nm |
| 10 - | Dust cap |
| Fit onto bleeder valve |
| 11 - | Bleeder valve |
| Before screwing in, apply thin coat of assembly paste -G 052 150 A2- to thread. |
| 8 Nm |
 Assembly overview - brake servo/brake master cylinder, RHD vehicles
Complete brake master cylinders and brake servos can be renewed
independently of each other.
1 -
Mounting bracket with brake pedal
Assembly ...
 Assembly overview – Brake system pressure accumulator -VX70-, RHD vehicles
1 -
Brake system pressure accumulator -VX70-
Removing and installing
→ Chapter
2 -
Brake line
To ...
Other materials:
Assembly overview - control unit and hydraulic unit, LHD vehicles
1 -
ABS control unit -J104-
Removing and installing
→ Chapter.
2 -
ABS hydraulic unit -N55-
Removing and installing
→ Chapter.
3 -
Torx bolt
...
Indicator lamps and fuel gauge
Fig. 187 In the instrument cluster: fuel
gauge for petrol and diesel
First read and observe the introductory information
and safety warnings
Lit up
Needle position
Possible cause
Solution
Red mark ...
Removing and installing front tunnel cross-piece
Special tools and workshop equipment
required
Torque wrench -V.A.G 1331-
Removing
–
If fitted, remove centre underbody panel
→ ...
