Volkswagen Golf Service & Repair Manual: Assembly overview - suspension strut, shock absorber, spring, multi-link
suspension
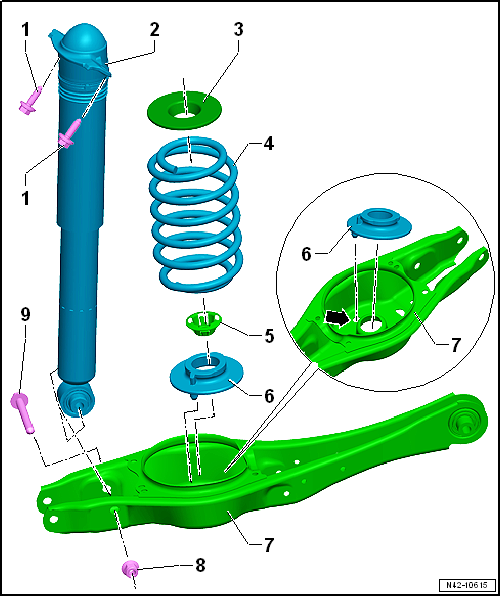
| Removing and installing
→ Chapter |
| Note correct installation position of cable tie fastener.
|
| Defective shock absorbers must always be degassed and drained before
disposal
→ Chapter |
| Removing and installing
→ Chapter |
| Assists with installation |
| Turn end of spring against stop |
| When installing, fit pin into aperture in spring mounting on lower
transverse link -arrow-. |
| 7 - |
Lower transverse link |
| Always tighten bolted connection with suspension in unladen position
→ Chapter |
1 -
Bolt
Renew after removing
50 Nm +45°
2 -
Shock absorber
Removing and installing ...
Special tools and workshop equipment required
Torque wrench -V.A.G 1332-
Torque wrench -V.A.G 1410-
Spring compressor -V.A.G 1752/1 ...
Other materials:
Removing and installing toothed belt pulley for coolant pump, engine codes
CHPA, CMBA, CPVA, CXSA, CZDA, CZCA, CPVB
Special tools and workshop equipment
required
Counterhold -T10172- with adapter -T10172/2-
Removing
–
Remove coolant pump
→ Ch ...
Cigarette lighter, socket
Removing and installing cigarette lighter
-U1-
Note
All instructions and notes regarding this chapter are
available under
→ Electrical System, General Information; Rep. gr.96.
&nb ...
Assembly overview - drive unit of air conditioner compressor, Golf and Golf
Estate
Note
The illustration shows a different version.
1 -
Poly V-belt
Removing and installing
→ Rep. gr.13.
Mark the direction of rotation and ensure t ...
© 2016-2026 Copyright www.vwgolf.org

 Assembly overview - suspension strut, shock absorber, spring, torsion beam
axle
Assembly overview - suspension strut, shock absorber, spring, torsion beam
axle Removing and installing shock absorber, torsion beam axle