Volkswagen Golf Service & Repair Manual: Assembly overview - evaporator housing
 Note Note
| There are different designs and makes of heater and air
conditioning unit. The individual components of the various
heaters and air conditioning units are similar but not
identical. The combined fitting of different makes of component
is therefore not permissible
→ Electronic Parts Catalogue. |
| The following illustration shows a “Valeo” evaporator
housing, distinguishing features with respect to other makes of
heater and air conditioning unit
→ Chapter. |
| The illustration shows a left-hand drive vehicle. |
|
|
|
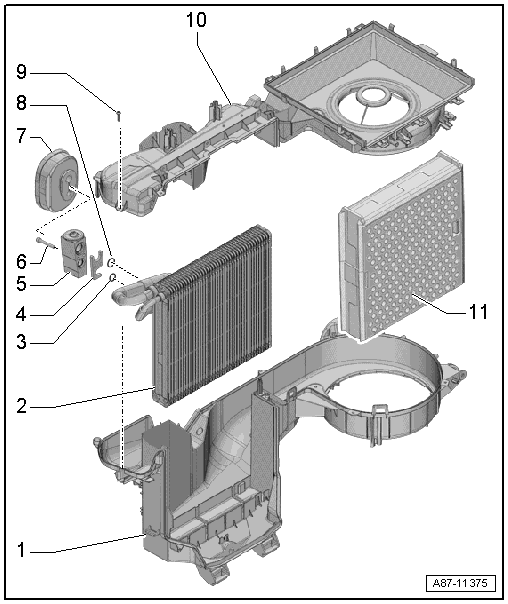
| 1 - |
Evaporator housing, lower part |
| Only if air conditioning system is fitted. |
| Check foam seals for damage and proper attachment |
| Removing and installing
→ Chapter. |
| Only on vehicles with air conditioning system. |
| Renewing; for versions, refer to
→ Electronic Parts Catalogue. |
| Before fitting a seal, coat lightly with refrigerant oil |
| Only if air conditioning system is fitted. |
| For securing refrigerant lines and expansion valve. |
| Only if air conditioning system is fitted. |
| Removing and installing
→ Chapter. |
| Only if air conditioning system is fitted. |
| 7 - |
Sealing and insulation |
| Heat insulation for expansion valve. |
| There is no opening for the expansion valve in the plenum chamber
back wall seal or this is closed off by a foam pad on vehicles with no
air conditioner |
| Only on vehicles with air conditioning system. |
| Renewing; for versions, refer to
→ Electronic Parts Catalogue. |
| Before fitting a seal, coat lightly with refrigerant oil |
| 10 - |
Evaporator housing, upper part |
| Only on vehicles with no air conditioning system installed |
Note
There are different designs and makes of heater and air
conditioning unit. The individual components of the various
heaters and air conditio ...
Note
The illustration shows a left-hand drive vehicle.
View from front
Note
-Arrow-&nbs ...
© 2016-2026 Copyright www.vwgolf.org

 Assembly overview - add-on parts of heater and air conditioning unit and of
air intake box
Assembly overview - add-on parts of heater and air conditioning unit and of
air intake box Assembly overview - flaps and partitions in air distribution housing