Volkswagen Golf Service & Repair Manual: Assembly overview - brake caliper (PC57 brakes)
| When carrying out repairs, install all parts supplied in repair kit. |
| Use only methylated spirits for cleaning the brake. |
| Apply thin coat of assembly paste G 052 150 A2 to brake cylinder, piston and sealing ring. |
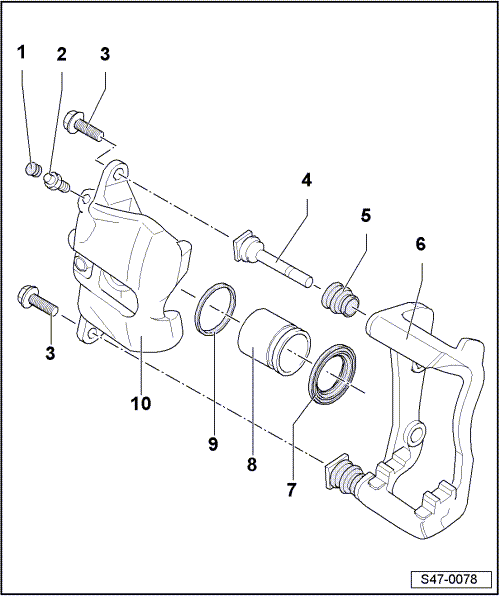
| 1 - | Dust cap |
| Fit onto bleeder valve. |
| 2 - | Bleeder valve |
| Apply thin coat of assembly paste G 052 150 A2 to thread before screwing in. |
| 10 Nm |
| 3 - | Hexagon bolt |
| Renew after removing. |
| 35 Nm |
| 4 - | Guide pin |
| 5 - | Protective cap |
| Insert into brake carrier and guide pin groove; grease groove beforehand, use repair kit grease pack. |
| 6 - | Brake carrier |
| Supplied as preassembled replacement part with greased guide pins and protective caps. |
| If protective caps or guide pins are damaged, install repair kit. Use lubricant sachet supplied to lubricate guide pins. |
| 7 - | Protective cap |
| Removing and installing → Chapter |
| When inserting piston, take care not to damage it. |
| 8 - | Piston |
| Removing and installing → Chapter |
| Apply thin coat of assembly paste G 052 150 A2 to piston before installing. |
| 9 - | Sealing ring |
| Removing and installing → Chapter |
| 10 - | Brake caliper |

 Removing and installing brake caliper PC57
Special tools and workshop equipment
required
Removal wedge -3409-
...
Other materials:
Removing and installing fuel gauge sender -G-, vehicles with front-wheel
drive
Removing
–
Remove fuel delivery unit
→ Chapter.
–
Note colour assignment of cables -1-
for re-installation.
– ...
Removing and installing engine control unit -J623- (with metal locking
plate)
Special tools and workshop equipment
required
Hot air blower -VAS 1978/14A--1-
with nozzle -2- from wiring harness
repair set -VAS 1978 B-
Small grinder (commerci ...
Checklist
The following actions must always be carried out in the given order
in preparation for changing the wheel :
In the event of a flat tyre, park your
vehicle on a firm and level surface at a safe distance from the flow of traffic.
Switch on the electronic parking brake
Braking, st ...
