Volkswagen Golf Service & Repair Manual: Removing and installing tail light in rear lid
 Note Note
| Removal and installation are described for the left side.
Removal and installation on the right side are carried out in
the same way. |
| If the event of a defective LED, the entire tail light needs
to be renewed. |
| – |
Turn light switch to “0” position. |
 Caution
| Danger of damage to component surfaces. |
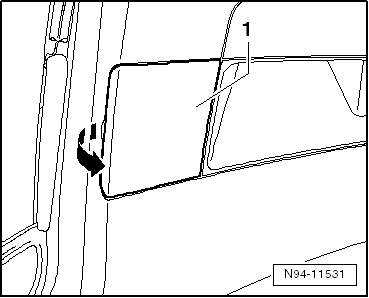
| When using leverage tools, mask visible areas of the
component with commercially available adhesive tape. |
|
|
|
|
| – |
If needed, apply a narrow screwdriver at opening on side.
|
| – |
Press off cover -1- in
-direction of arrow-. |
|
|
|
| – |
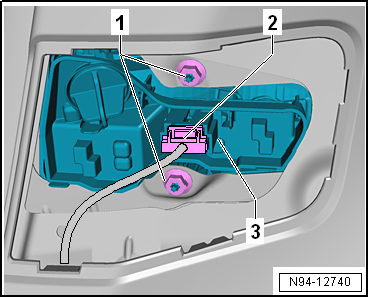
Disconnect electrical connector -2-. |
| – |
Remove left tail light 2 -MX5--3-
outwards. |
| Install in the reverse order of removal, observing the
following: |
Note
| Ensure that the gap between vehicle body and tail light
housing is properly sealed by the seal. |
| Make sure that the connector is engaged firmly. |
| – |
Swing left tail light 2 -MX5- from the outside into rear lid
opening. |
| – |
Align it properly to make contact at top and centre. |
| – |
Screw on nuts first at top and then at bottom of left tail
light 2 -MX5- and tighten them. |
| → Chapter „Assembly overview - tail lights in rear lid, with
bulbs“ |
|
|
|
1 -
Bulb holder
For left reversing light bulb -M16-/right reversing light bulb
-M17-.
Removing and installing
→ Chapter
...
Note
Installation position can only be corrected on tail light
cluster on body.
Removal and installation are described for ...
Other materials:
General notes
Mobile online services are available only in conjunction
with a radio/RNS -RX1-.
For vehicles equipped with a telephone, the telephone
functions are integrated into the emergency call module control
unit and communication unit -J949-.
...
Checking fuel delivery rate
Special tools and workshop equipment required
Removal wedge -3409-
Remote control for V.A.G. 1348 -V.A.G 1348/3A-
Multimeter e.g. hand-held multimeter -V.A.G 1526E-
Test instrument adapter/DSO (5-pin) -VAS 5565-
...
Checking a battery with colour indicator
WARNING
Danger of injury! Observe warning notices and safety
regulations
→ Chapter!
Carry out procedure in sequence as follows:
1.
...
© 2016-2026 Copyright www.vwgolf.org

 Assembly overview - tail lights in rear lid, with LEDs
 Adjusting installation position of tail light