Volkswagen Golf Service & Repair Manual: Seam seals, middle body
 Note Note
| Seam seals made during repair work must be identical in
appearance and thickness to the original seam seals. |
| To avoid damage or faulty operation, brush seam seals smooth
near attachments which must be attached. |
| Water drainage holes must remain clear. |
| All threaded studs and welded nuts with metric threads as
well as all other studs and contact surfaces for assembly must
be functional following the extent of the sealing work. |
| Sealant must never be applied to bare substrates. Substrates
must always be filled first. |
|
|
|
| Seam seals, roof without sunroof |
| Illustration shows left side. The right side is the mirror image. |
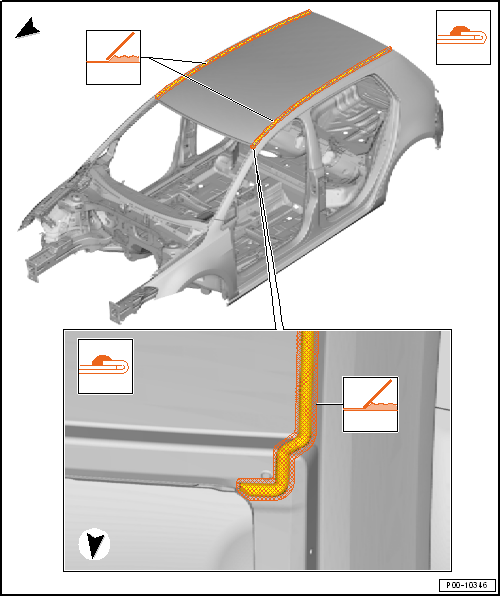
| Fine seam seals require that the sealant extend at least 3 mm from
the seam in each direction and must have a height of 0.5 mm. |
| Sealant in the marked areas must be smoothed following application. |
Note
| When smoothing the sealant seam, ensure that the sheet metal edges
which are to be protected are not exposed and that the metal is covered
with a sufficiently thick layer of PVC. |
| Seam seals, roof with sunroof |
| In the magnifying glass views the left side is shown. The right side
is the mirror image. |
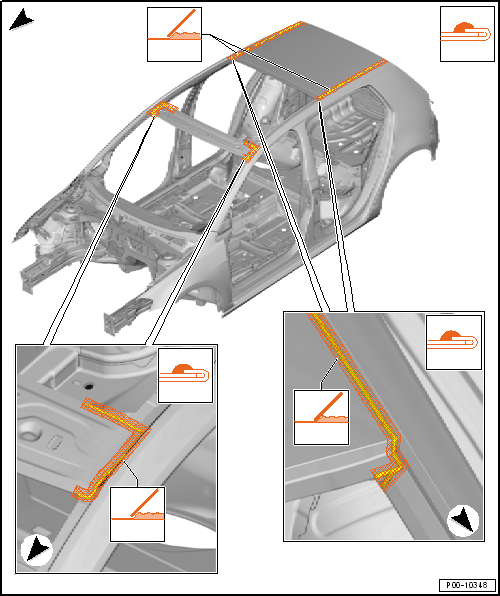
| Fine seam seals require that the sealant extend at least 3 mm from
the seam in each direction and must have a height of 0.5 mm. |
| Sealant in the marked areas must be smoothed following application. |
Note
| When smoothing the sealant seam, ensure that the sheet metal edges
which are to be protected are not exposed and that the metal is covered
with a sufficiently thick layer of PVC. |
| Seam seals, front door of 2-door |
| In the illustration the left door is shown. The right side is the
mirror image. |
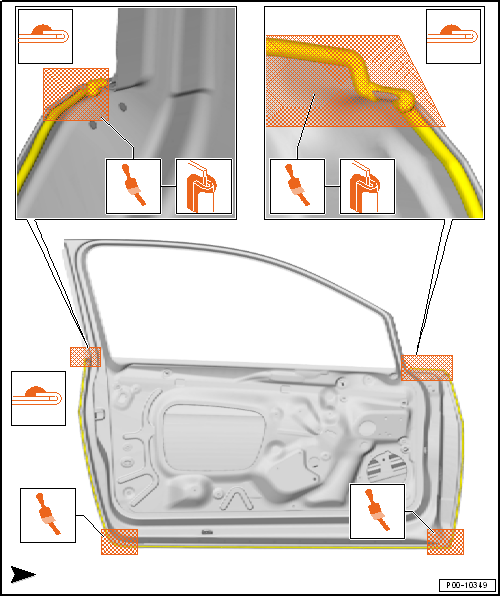
| Fine seam seals require that the sealant extend at least 3 mm from
the seam in each direction and must have a height of 0.5 mm. |
| - |
Sealing the folded seam groove |
| The marked areas must be closed following application of sealant to
the folded seam groove. |
| Sealant in the marked areas must be brushed following application. |
Note
| When brushing the sealant seam, ensure that the sheet metal edges
which are to be protected are not exposed and that the metal is covered
with a sufficiently thick layer of PVC. Ensure that the “U” of the
folded seam remains sealed. |
| Seam seals, front door of 4-door |
| In the illustration the left door is shown. The right side is the
mirror image. |

| Fine seam seals require that the sealant extend at least 3 mm from
the seam in each direction and must have a height of 0.5 mm. |
| - |
Sealing the folded seam groove |
| The marked areas must be closed following application of sealant to
the folded seam groove. |
| Sealant in the marked areas must be brushed following application. |
Note
| When brushing the sealant seam, ensure that the sheet metal edges
which are to be protected are not exposed and that the metal is covered
with a sufficiently thick layer of PVC. Ensure that the “U” of the
folded seam remains sealed. |
| Seam seals, rear door of 4-door |
| In the illustration the left door is shown. The right side is the
mirror image. |

| Fine seam seals require that the sealant extend at least 3 mm from
the seam in each direction and must have a height of 0.5 mm. |
| - |
Sealing the folded seam groove |
| The marked areas must be closed following application of sealant to
the folded seam groove. |
| Sealant in the marked areas must be brushed following application. |
Note
| When brushing the sealant seam, ensure that the sheet metal edges
which are to be protected are not exposed and that the metal is covered
with a sufficiently thick layer of PVC. Ensure that the “U” of the
folded seam remains sealed. |
| Seam seals, centre underbody |
| In the upper magnifying glass view, the floor section and the left
side member is shown. The right side is the mirror image. |
| In the lower magnifying glass view, the right side of the tunnel
reinforcement is shown. The left side is the mirror image. |
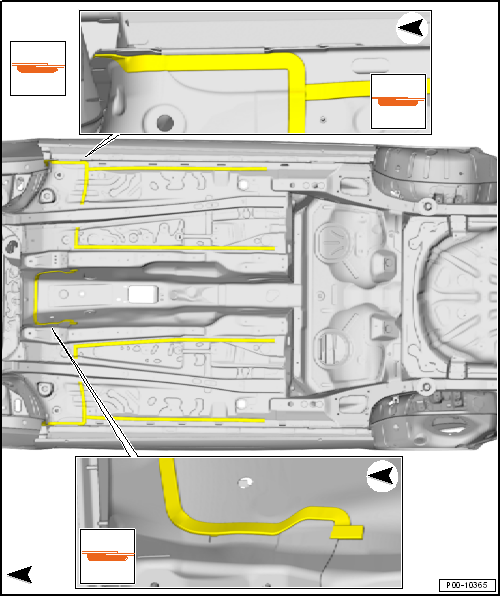
| Coarse seam seals require that the sealant be applied at least 20 mm
wide and 2 mm high. |
Note
Seam seals made during repair work must be identical in
appearance and thickness to the original seam seals.
To avoid ...
Note
Seam seals made during repair work must be identical in
appearance and thickness to the original seam seals.
To avoid ...
Other materials:
Ensuring proper assembly temperature for tyres
Caution
Risk of damage to tyres due to excessive heat.
Never heat tyres with a radiator or hot air blower.
Heat tyres with warm water or warm air (m ...
Wiring harness repair set -VAS 1978
Wiring harness repair set -VAS 1978- allows optimal repair
quality to be achieved in the area of vehicle electrics. Using
the tools, repairs to connectors and wiring open circuits can be
carried out. To do this, complete repair wire sections with
contact ...
Assembly overview - radiator and radiator fan
1 -
Radiator
Removing and installing
→ Chapter
Change coolant after renewing.
2 -
Coolant hose
Pull out retaining clip to remove.
Connecting → Fig.
...
© 2016-2026 Copyright www.vwgolf.org

 Seam seals, front body
 Seam seals, rear body