Volkswagen Golf Service & Repair Manual: Seam seals, front body
 Note
| Seam seals made during repair work must be identical in
appearance and thickness to the original seam seals. |
| To avoid damage or faulty operation, brush seam seals smooth
near attachments which must be attached. |
| Water drainage holes must remain clear. |
| All threaded studs and welded nuts with metric threads as
well as all other studs and contact surfaces for assembly must
be functional following the extent of the sealing work. |
| Sealant must never be applied to bare substrates. Substrates
must always be filled first. |
|
|
|
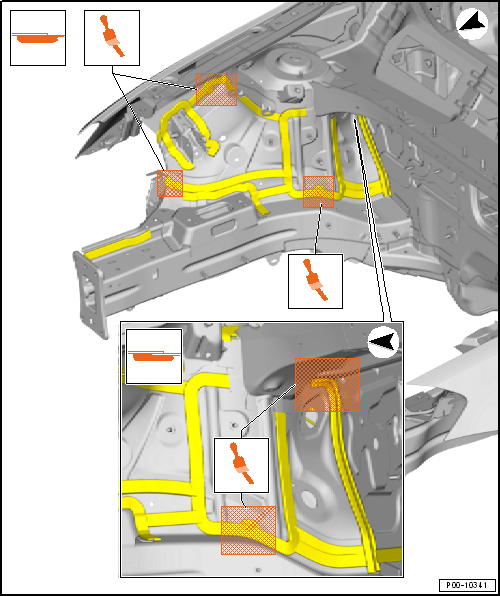
| Seam seals, left suspension turret |
| Coarse seam seals require that the sealant be applied at least 20 mm
wide and 2 mm high. |
| Fine seam seals require that the sealant extend at least 3 mm from
the seam in each direction and must have a height of 0.5 mm. |
| Sealant in the marked areas must be brushed following application. |
Note
| When brushing the sealant seam, ensure that the sheet metal edges
which are to be protected are not exposed and that the metal is covered
with a sufficiently thick layer of PVC. |
| Seam seals, right suspension turret |
| Coarse seam seals require that the sealant be applied at least 20 mm
wide and 2 mm high. |
| Fine seam seals require that the sealant extend at least 3 mm from
the seam in each direction and must have a height of 0.5 mm. |
| Sealant in the marked areas must be brushed following application. |
Note
| When brushing the sealant seam, ensure that the sheet metal edges
which are to be protected are not exposed and that the metal is covered
with a sufficiently thick layer of PVC. |
| Seam seals, left side of engine compartment |
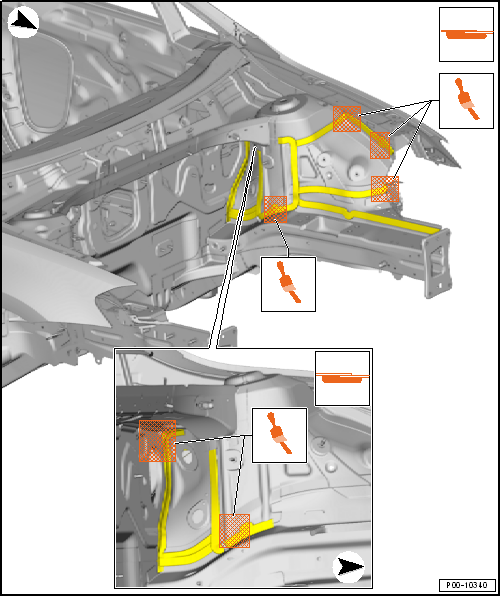
| Coarse seam seals require that the sealant be applied at least 20 mm
wide and 2 mm high. |
| Sealant in the marked areas must be brushed following application. |
Note
| When brushing the sealant seam, ensure that the sheet metal edges
which are to be protected are not exposed and that the metal is covered
with a sufficiently thick layer of PVC. |
| Seam seals, right side of engine compartment |
| Coarse seam seals require that the sealant be applied at least 20 mm
wide and 2 mm high. |
| Sealant in the marked areas must be brushed following application. |
Note
| When brushing the sealant seam, ensure that the sheet metal edges
which are to be protected are not exposed and that the metal is covered
with a sufficiently thick layer of PVC. |
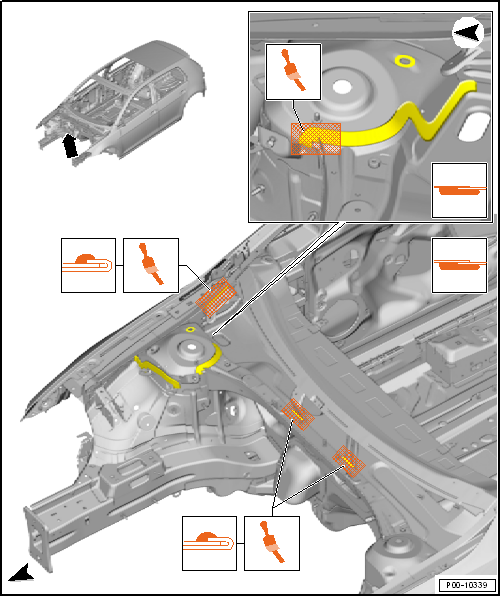
| Seam seals, centre of engine compartment |
| Upper illustration for LHD vehicles |
| Lower illustration for RHD vehicles |
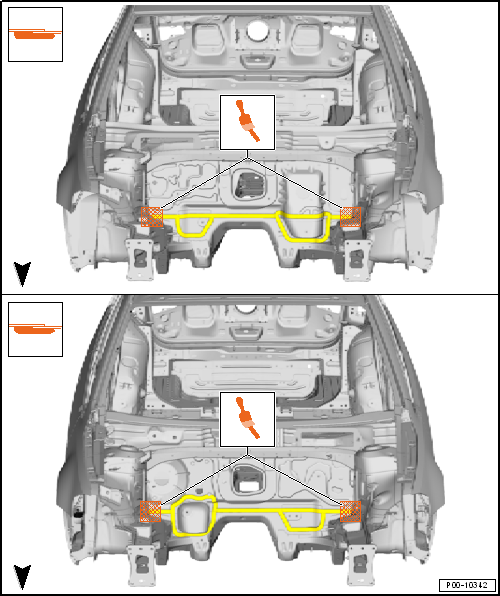
| Coarse seam seals require that the sealant be applied at least 20 mm
wide and 2 mm high. |
| Sealant in the marked areas must be brushed following application. |
Note
| When brushing the sealant seam, ensure that the sheet metal edges
which are to be protected are not exposed and that the metal is covered
with a sufficiently thick layer of PVC. |
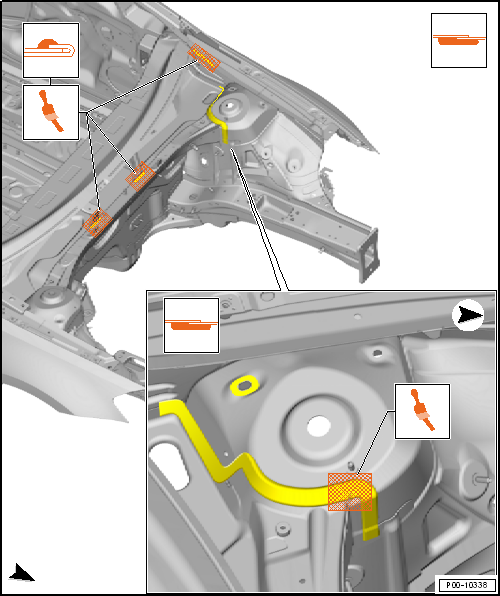
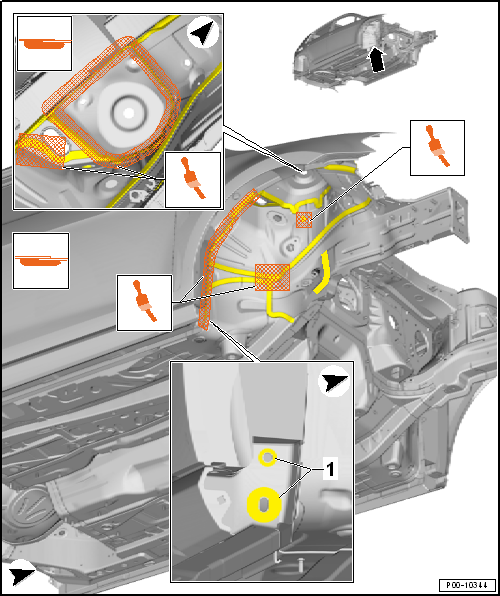
| Seam seals, left wheel housing |

| Coarse seam seals require that the sealant be applied at least 20 mm
wide and 2 mm high. |
| Sealant in the marked areas must be brushed following application. |
Note
| When brushing the sealant seam, ensure that the sheet metal edges
which are to be protected are not exposed and that the metal is covered
with a sufficiently thick layer of PVC. |
| 1 - |
Water drain holes free of sealant. |
| Seam seals, right wheel housing |
| Coarse seam seals require that the sealant be applied at least 20 mm
wide and 2 mm high. |
| Sealant in the marked areas must be brushed following application. |
Note
| When brushing the sealant seam, ensure that the sheet metal edges
which are to be protected are not exposed and that the metal is covered
with a sufficiently thick layer of PVC. |
| 1 - |
Water drain holes free of sealant. |
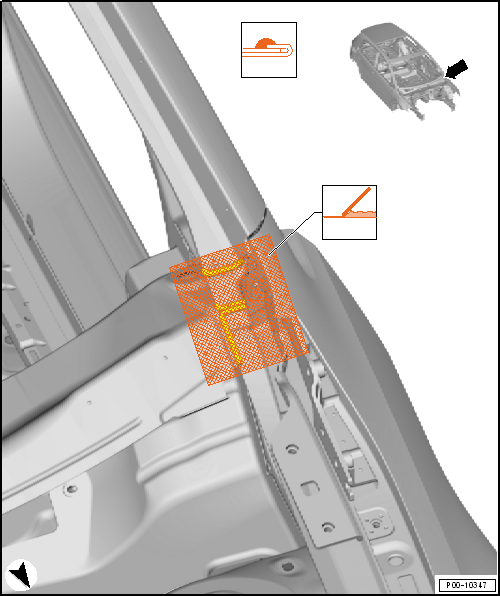
| Illustration shows left side. The right side is the mirror image. |

| Fine seam seals require that the sealant extend at least 3 mm from
the seam in each direction and must have a height of 0.5 mm. |
| Sealant in the marked areas must be smoothed following application. |
| Sealant in the marked areas must be brushed following application. |
Note
| When smoothing or brushing the sealant seam, ensure that the sheet
metal edges which are to be protected are not exposed and that the metal
is covered with a sufficiently thick layer of PVC. |
| As of model year 2014, the areas to be smoothened shown in the
illustration must be brushed. |
| Illustration shows left side. The right side is the mirror image. |
| Fine seam seals require that the sealant extend at least 3 mm from
the seam in each direction and must have a height of 0.5 mm. |
| Sealant in the marked areas must be smoothed following application. |
Note
| When smoothing the sealant seam, ensure that the sheet metal edges
which are to be protected are not exposed and that the metal is covered
with a sufficiently thick layer of PVC. |
Note
Seam seals made during repair work must be identical in
appearance and thickness to the original seam seals.
To avoid ...
Other materials:
Overview of fitting locations - operating and display unit, Climatronic
Note
A warning lamp in the instrument panel controls will
indicate that the selected function is active. In addition, the
display of the radio or of the radio navigation system will
indicate the selected function for a short time when a bu ...
Closing sunroof by hand
Removing
–
Remove glass panel
→ Chapter.
–
If drive is defective, remove glass panel
→ Chapter.
–
Pull self-adhesive insulation -3- off.
–
Remove bolts -2-.
...
Introduction
This chapter contains information on the following subjects:
→ Technical requirements
→ Mechanically positioned ball coupling
→ Fitting a bicycle carrier on the mechanically positioned ball coupling
→ Hitching and connecting the trailer
...
© 2016-2026 Copyright www.vwgolf.org

 Seam seals
 Seam seals, middle body