Volkswagen Golf Service & Repair Manual: Renewing bonded rubber bush for wheel bearing housing, front-wheel drive
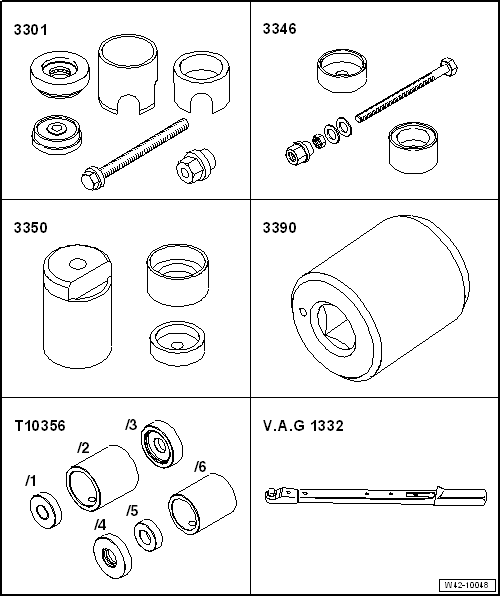
| Special tools and workshop equipment required |
| Torque wrench -V.A.G 1332- |
| Vehicles with vehicle level sender |
|
|
|
| – |
Remove retainer for rear left vehicle level sender-2-. |
| Vehicles with stone guard |
|
|
|
| – |
Remove spreader rivet -1-. |
| – |
Unscrew bolts -2- for stone
deflector -3-. |
| Continuation for all vehicles |
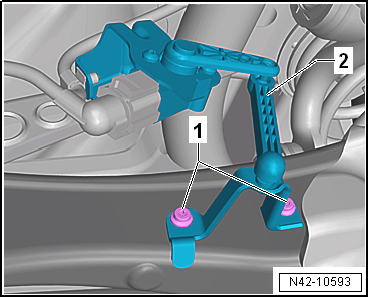
| – |
Remove spring
→ Chapter. |
|
|
|
| – |
Unscrew nut -1- from coupling
rod -2-. |
| – |
Pull coupling rod -2- out of
anti-roll bar -3-. |
|
|
|
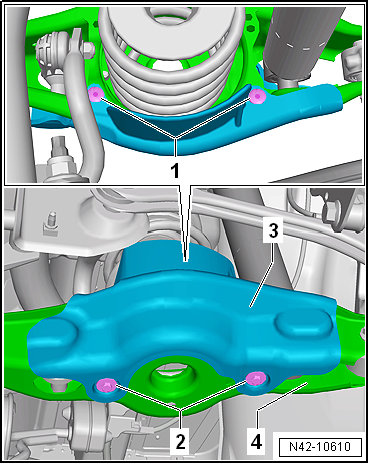
| – |
Unscrew nut -1- and pull out
bolt -2- securing shock absorber. |
| – |
Unscrew nut -3- and pull out
bolt -4- securing wheel bearing
housing. |
|
|

|
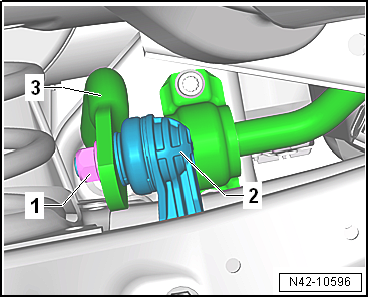
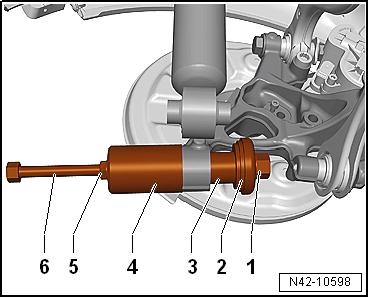
| Pressing out bonded rubber bush |
| 2 - |
Thrust disc from assembly tool -3301- |
| 4 - |
Sleeve from assembly tool -3350- |
| – |
Pull out bonded rubber bush by turning nut -3346/3--1-.
When doing this, counterhold spindle -3346/2--6-. |
|
|
|
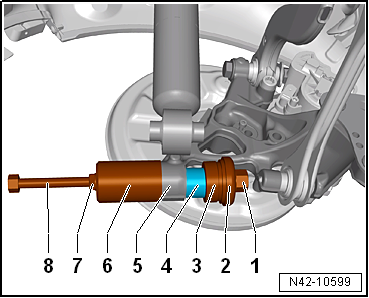
| Pulling in bonded rubber bush |
| 2 - |
Thrust disc from assembly tool -3301- |
| 3 - |
Thrust piece -T10356/5- |
| 5 - |
Wheel bearing housing |
| 6 - |
Sleeve from assembly tool -3350- |
| – |
Pull in bonded rubber bush to stop by turning nut -3346/3--1-.
When doing this, counterhold spindle -3346/2--8-. |
 Note Note
| Insert bearing carefully so it does not cant. |
| Install in reverse order of removal, observing the
following: |
| → Chapter „Assembly overview - wheel bearing assembly“ |
| → Chapter „Assembly overview - suspension strut, shock absorber,
spring, multi-link suspension“ |
| → Chapter „Assembly overview - anti-roll bar, multi-link
suspension, front-wheel drive“ |
| → Chapter „Torque settings for wheel bolts“ |
| The threaded connections to the lower transverse link may
only be loosened and tightened in the unladen weight position
→ Chapter. |
| On vehicles with vehicle level sender, carry out basic
settings for wheel damper electronics → Vehicle
diagnostic tester. |
| On vehicles with vehicle level sender, carry out basic
adjustment of headlights
→ Electrical system; Rep. gr.94. |
|
|
|
Special tools and workshop equipment
required
Torque wrench -V.A.G 1332-
...
Special tools and workshop equipment required
Assembly tool -3301-
Viscous fan fitting tool -3367-
Carrier -3390-
Torqu ...
Other materials:
Dealing with problems with Midtronics -MCR340V- battery tester
Under certain circumstances, the display may show errors or
messages according to status.
The most frequent display messages are listed below,
together with suggested solutions.
Note
For messages not liste ...
Removing and installing windscreen
Note
The removal of a bonded window is described using the
Removal kit for flush bonded windows -V.A.G 1474 A-.
Alternatively, you can also use the cutting tool for bonded
windows -VAS 6452-.
...
Fitting the front towing eye
Fig. 246 In the right-hand side of the
front bumper: removing the cover
Fig. 247 Front bumper, right-hand side:
screwing in the towing eye
First read and observe the introductory information
and safety warningsThe towing eye is screwed into a threaded hole behind
a cover on the right of ...
© 2016-2026 Copyright www.vwgolf.org

 Removing and installing wheel bearing unit, multi-link suspension,
four-wheel drive
Removing and installing wheel bearing unit, multi-link suspension,
four-wheel drive Renewing bonded rubber bush for wheel bearing housing, four-wheel drive