Volkswagen Golf Service & Repair Manual: Removing and installing windscreen washer pump
| Special tools and workshop equipment
required |
| – |
Remove front left wheel housing liner
→ General body repairs, exterior; Rep. gr.66. |
|
|
|
| – |
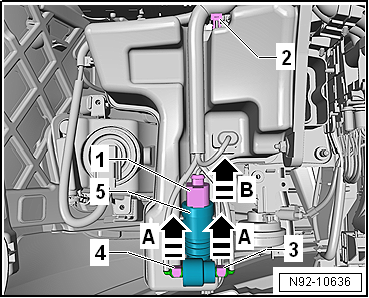
Disconnect electrical connector -1-. |
| Wiring harness -2- remains
connected to washer fluid reservoir. |
| – |
Place drip tray under washer fluid reservoir. |
| – |
Release securing clips -3- and
-4- in direction of arrow
-A-. |
| – |
Pull water line off washer pump -5-. |
| – |
Pull washer pump -5- upwards
-arrow B- out of washer fluid
reservoir. |
| Install in the reverse order of removal, observing the
following: |
 Note Note
| The connections at the pump and hoses are colour-marked to
prevent incorrect connection of the washer fluid lines to the
windscreen and rear window washer pump -V59-. The hose fittings
must be connected to the correct colour-coded pump connections
during installation. |
| – |
Check sealing grommet for damage. |
|
|
|
Special tools and workshop equipment
required
Drip tray
Note
Dependent on the equipment level, the windsc ...
Special tools and workshop equipment
required
Drip tray
Removing
–
Remove washer fl ...
Other materials:
Removing and installing manufacturer emblem
Note
The emblem cannot be removed without damage.
Removing
–
Use a screwdriver -3- to carefully
lever manufacturer emblem -1- out of
radiator grille -2- in
-direction of arrow A-.
Installing
–
...
Safety precautions when using testers and measuring instruments during a
road test
Risk of injury through insecure testing and measuring instruments
When the front passenger airbag is triggered in an accident,
insufficiently secured testing and measuring instruments become
dangerous projectiles.
–
Secure testing and measuring in ...
2-pack wash primer
Designation:
2-pack wash primer -LLS MAX 230 M1-, olive-green (250 ml)
Issued 12.2013
Product description
The 2-pack wash primer -LLS MAX 230 M1- is a zinc
chromate-free ...
© 2016-2026 Copyright www.vwgolf.org


 Removing and installing windscreen washer fluid level sender,
»R«
Removing and installing windscreen washer fluid level sender,
»R« Removing and installing washer pump, »R«