Volkswagen Golf Service & Repair Manual: Removing and installing windscreen washer fluid level sender,
»R«
| Special tools and workshop equipment
required |
 Note Note
| Dependent on the equipment level, the windscreen washer
fluid level sender -G33- may either be renewed individually or
together with the washer fluid reservoir. |
| – |
Remove front right wheel
→ Running gear, axles, steering; Rep. gr.44. |
| – |
Remove front part of front right wheel housing liner
→ General body repairs, exterior; Rep. gr.66. |
| – |
Place drip tray under washer fluid reservoir. |
|
|
|
| – |
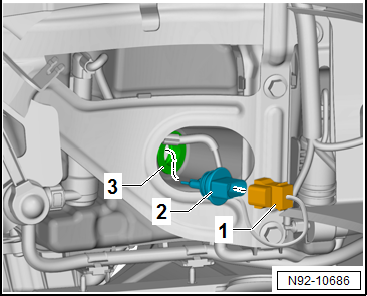
Disconnect electrical connector -1-. |
| – |
Pull windscreen washer fluid level sender -G33--2-
out of washer fluid reservoir. |
| – |
If necessary, remove seal -3-
from washer fluid reservoir. |
| Install in the reverse order of removal, observing the
following: |
| – |
Ensure that seal is fitted correctly to opening in washer
fluid reservoir. |
| – |
Coat seal with washer fluid so that windscreen washer fluid
level sender -G33- can be inserted more easily. |
|
|
|
Special tools and workshop equipment
required
Drip tray
Note
Dependent on the equipment level, the windsc ...
Special tools and workshop equipment
required
Drip tray
Removing
–
Remove front lef ...
Other materials:
Fuse table
Fig. 230 In the dash panel: fuse layout
First read and observe the introductory information
and safety warningsThe table shows the fuse locations for the items of electrical
equipment which are most relevant to the customer. The left column contains the
location, the other columns contain t ...
Air conditioner compressor without magnetic clutch, with elastic drive
coupling
The air conditioner compressor is driven directly by the
power steering vane pump.
There is an overload protection on the drive shaft of the
air conditioner compressor, which shears in the event of the air
conditioner compressor seizing, ...
Removing and installing floor covering
Removing
–
Remove front seats
→ Chapter.
–
Remove rear bench seat
→ Chapter.
–
Remove sill panel mouldings
→ Chapter ...
© 2016-2026 Copyright www.vwgolf.org

 Removing and installing windscreen washer fluid level sender
 Removing and installing windscreen washer pump