Volkswagen Golf Service & Repair Manual: Removing and installing upper part of sump
| Special tools and workshop equipment
required |
|
|
|
| Allen key, long reach -T10058- |
| Hand drill with plastic brush |
| Sealant
→ Electronic Parts Catalogue |
|
|

|
| – |
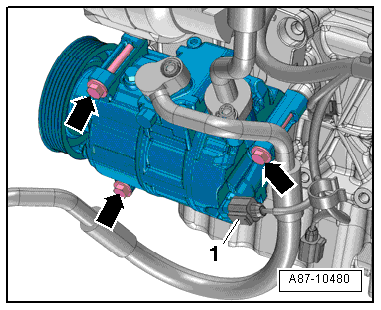
Remove air conditioner compressor from bracket
→ Heating, air conditioning; Rep. gr.87. |
| – |
Remove sump (bottom section)
→ Chapter. |
| – |
Remove oil pump
→ Chapter. |
|
|
|
| – |
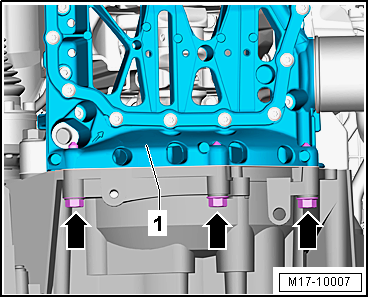
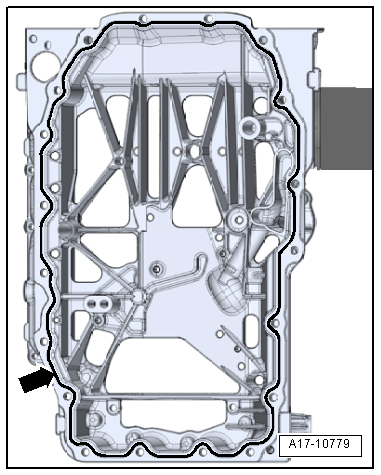
Unscrew securing bolts -arrows-
for gearbox to upper section of sump -1-. |
|
|
|
| – |
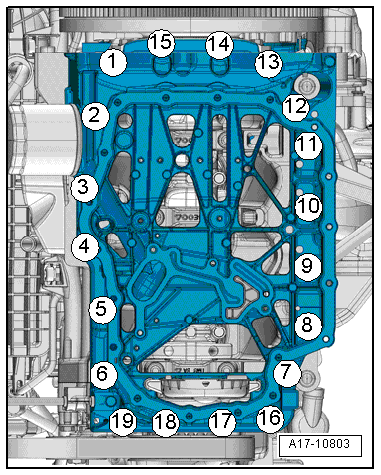
Loosen and unscrew bolts in the sequence
-19 … 1-. |
| – |
Carefully detach upper part of sump from adhesive bond. |
 Note Note
| Renew bolts that are tightened with specified tightening
angle. |
| Renew gaskets, oil seals and self-locking nuts. |
| Danger of soiling lubrication system. |
| Cover open parts of engine. |
| – |
Remove sealant residues from cylinder block with a flat
scraper. |
Risk of eye injury caused by sealant residue.Wear eye protection. |
|
|
| – |
Remove sealant residue from upper part of sump, e.g. with
rotating plastic brush. |
| – |
Check oil galleries in upper part of sump and cylinder block
for soiling. |
| – |
Remove any oil and grease from sealing surfaces. |
Note
|
|
|
| Observe expiry date of sealing compound. |
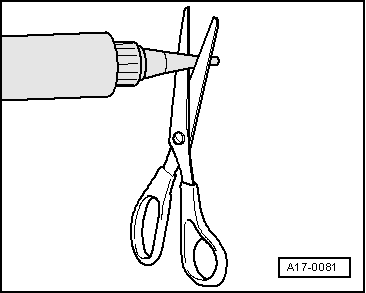
| – |
Cut off nozzle on tube at front marking (diameter of nozzle
approx. 2 mm). |
| Danger of blocking lubrication system with excess sealant. |
|
|
|
| Do not apply sealant bead thicker than specified. |
| – |
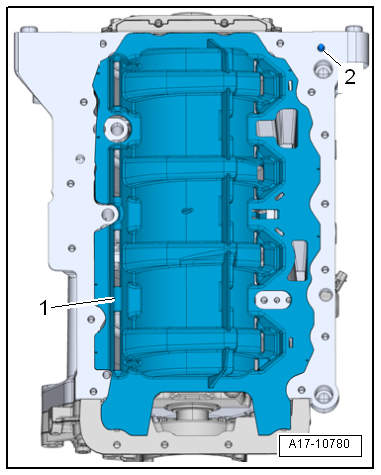
Apply bead of sealant -arrow-
onto clean sealing surfaces of upper part of oil sump as shown
in illustration. |
| Thickness of sealant bead: 2…3 mm. |
Note
| Upper part of oil sump must be installed within 5 minutes
after sealant has been applied. |
|
|
|
| – |
Check that dowel pin -2- is
securely seated in cylinder block. |
| – |
Attach baffle plate -1- to
cylinder block. |
| – |
Position upper part of oil sump and tighten bolts
→ Fig.. |
| Further installation steps are carried out in the reverse
order; note the following: |
| – |
Install oil pump
→ Chapter |
| – |
Install air conditioner compressor
→ Heating, air conditioning; Rep. gr.87. |
| – |
Replenish engine oil and check oil level
→ Booklet. |
| → Chapter „Assembly overview - sump and oil pump“ |
| Securing gearbox to engine
→ Rep. gr.34 |
|
|
|
Engine oil
| Oil capacities, oil specifications, viscosity grades
→ Maintenance tables. |
|
|
|
Removing
–
Remove sump (bottom section)
→ Chapter.
– ...
© 2016-2026 Copyright www.vwgolf.org

 Removing and installing oil pump