Volkswagen Golf Service & Repair Manual: Removing and installing the starter button -E378-
 Note Note
| The removal and installation procedures are described for
LHD vehicles. Removal and installation for RHD vehicles are
similar. |
| – |
Unclip and remove gear lever gaiter upwards from centre
console
→ Rep. gr.34. |
|
|
|
| – |
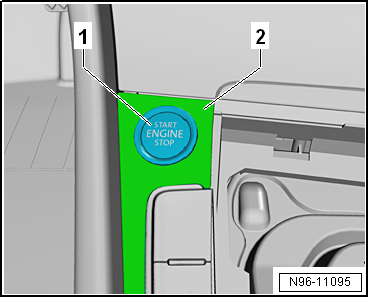
Press starter button -E378--1-
out of centre console -2- from
below. When doing so, retaining clips become released. |
| – |
Disconnect electrical connectors. |
| Installation is carried out in the reverse sequence. |
|
|
|
| Removing and installing rear lid contact
switch for anti-theft alarm -F123- |
Note
| The rear lid contact switch is an integral part of the rear
lid lock and cannot be renewed individually. |
| – |
Removing and installing rear lid lock
→ General body repairs, exterior; Rep. gr.55. |
|
|
|
| Removing and installing vanity mirror
contact switch -F147-/-F148- |
Note
| The vanity mirror contact switch is as integral part of the
sun visor bracket and cannot be renewed individually if
defective. |
| – |
Removing and installing sun visor
→ General body repairs, interior; Rep. gr.68. |
|
|
|
Note
The electromechanical parking brake button -E538- and the
auto-hold button -E540- are combined to form one component and
cannot be separated ...
Removing
–
Remove front interior light -WX1-
→ Chapter.
–&n ...
© 2016-2026 Copyright www.vwgolf.org

 Removing and installing electromechanical parking brake button
-E538-/auto-hold button -E540-
Removing and installing electromechanical parking brake button
-E538-/auto-hold button -E540- Removing and installing sunroof button -E325-