Volkswagen Golf Service & Repair Manual: Removing and installing side spoiler
| Special tools and workshop equipment
required |
|
|
|
| |
|
Hot air blower -V.A.G 1416 |
 Note
Note
| |
Only the left side is shown. The right side is similar. |
| |
The side spoiler cannot be removed without damage. |
| – |
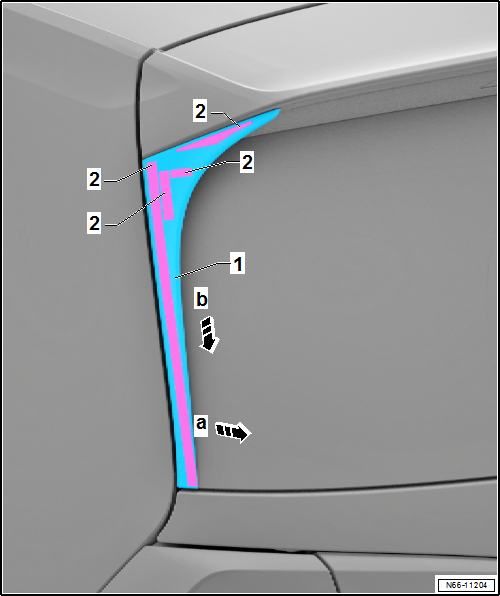
Apply hot air to side spoiler -1- in
area of adhesive strips -2- using hot air
blower -V.A.G 1416-. |
| – |
Pull side spoiler -1- off rear window
-arrow a-, and pull it downwards off roof
spoiler -arrow b-. |
| Installing new side spoiler |
| Special tools and workshop equipment
required |
| |
Professional cleaning cloth -VAS 6006- |
Note
| Only the left side is shown. The right side is similar. |
|
|
|
Note
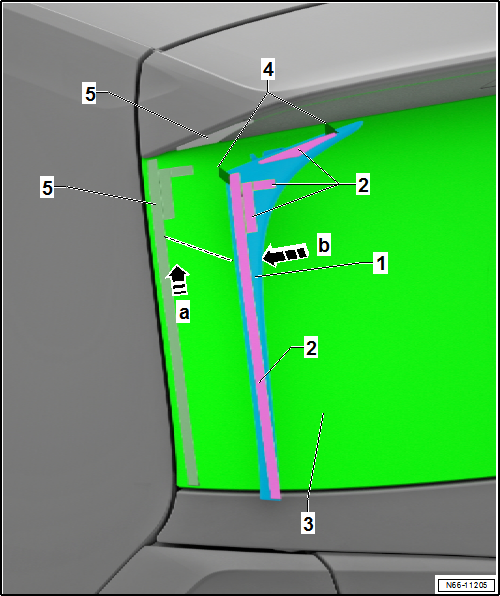
| The side spoiler -1- is bonded with
double-sided adhesive tape -2-. |
| – |
Place side spoiler -1- on rear window,
and mark the position with adhesive tape. |
| – |
Remove side spoiler -1-. |
| – |
Clean rear window and roof spoiler in marked area
-5- using cleaning solution. |
Note
-
| |
The application must be performed in one motion without
interruption using primer applicator. |
-
| |
A complete film must cover the glass surface. |
-
| |
Ensure to apply only one layer. |
| – |
Apply glass/paint primer uniformly to bonding surface
-3- on rear window, and wipe if off
slightly using professional cleaning cloth -VAS 6006-. |
| Glass/paint primer flash-off time: 5 minutes. |
| – |
Pull protective film -4- in upper area
off double-sided adhesive tape -2-. |
| – |
Slide side spoiler -1- under roof
spoiler -arrow-, and align side spoiler. |
| – |
Firmly press side spoiler -1- onto roof
spoiler. |
| – |
Pull protective film -4- off
double-sided adhesive tape -2- which is to
be attached to the window. |
| – |
Firmly press side spoiler -1- onto rear
window -3--arrow b-. |
| Installing removed side spoiler |
|
|
|
Note
-
| |
If a removed side spoiler is reused, the corresponding
adhesive strips need to be prepared for this. |
-
| |
Use an adhesive tape as per
→ Electronic Parts Catalogue “ETKA”. |
| – |
Completely remove any adhesive residue. |
| – |
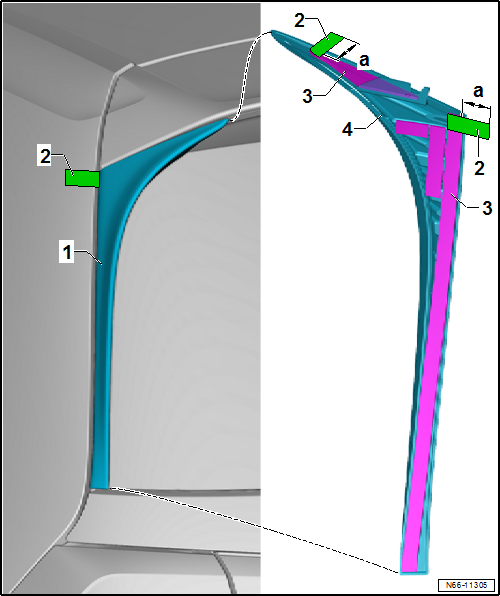
Clean spoiler -4- thoroughly using
cleaning solution. |
| – |
Prime bonding surfaces -3- evenly in
one stroke. |
| Glass/paint primer flash-off time: 5 minutes. |
| – |
Cut adhesive strips -3- to size as
shown in illustration. |
| – |
When doing this, make sure to leave a tab of the protective film
-2- to allow for pulling off protective
film -dimension a-. |
| – |
Further installation is performed in the same way as for a new
spoiler
→ Anchor. |
Removing
Note
The side spoiler remains installed.
–
Remove ...
Other materials:
Working on refrigerant circuit
Repairs requiring the opening of the refrigerant circuit
must only be carried out by specially trained personnel.
Notes on repairs to vehicles with air conditioning and on
handling refrigerant can be found in ELSA under
→ Air c ...
Blender
Designation:
Blender -LVE 013 100 A2-
Issued 10.2012
Product description
Blender was developed to guarantee easy blending-in of
2-pack clear coats and top coats.
...
Assembly overview - front brakes
Note
After every brake pad change, depress brake pedal firmly
several times with vehicle stationary, so that brake pads are
properly seated in their normal operating position.
Use the brake filling and bleeding equip ...
© 2016-2026 Copyright www.vwgolf.org

 Removing and installing roof spoiler