Volkswagen Golf Service & Repair Manual: Removing and installing headlight range control regulator -E102-
 Note Note
| The removal and installation procedures are described for
LHD vehicles. Removal and installation for RHD vehicles are
similar. |
| – |
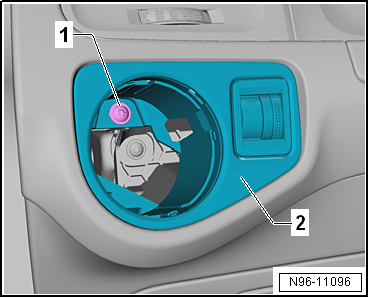
Remove rotary light switch -EX1-
→ Chapter. |
|
|
|
| – |
Remove trim -2- together with
headlight range control regulator -E102- from dash panel. |
| – |
Disconnect electrical connectors. |
|
|
|
| – |
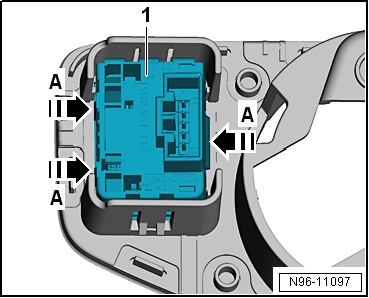
Press fasteners on headlight range control regulator -E102--1-
in direction of arrow -A-. |
| – |
Push headlight range control regulator -E102--1-
out of trim. |
| Installation is carried out in the reverse sequence. |
|
|
|
| Removing and installing button for
Charisma -E735- |
| Removing and installing
→ Chapter |
|
|
|
| Removing and installing TCS and ESP button
-E256- |
| Removing and installing
→ Chapter |
|
|
|
| Removing and installing TCS and ESP button
-E256- |
| Removing and installing
→ Chapter |
|
|
|
| Removing and installing park assist
steering button -E581- |
| Removing and installing
→ Chapter |
|
| Removing and installing park assist
steering button -E581- |
| Removing and installing
→ Chapter |
|
| Removing and installing button for
Charisma -E735- |
| Removing and installing
→ Chapter |
|
|
|
Note
The removal and installation procedures are described for
LHD vehicles. Removal and installation for RHD vehicles are
similar.
...
Special tools and workshop equipment
required
Removal wedge -3409-
...
Other materials:
Tyre sealant disposal
Tyre sealant or residue must not be mixed or disposed of
with other fluids.
Excess tyre sealant must be collected and stored in a
plastic container. The plastic container can be disposed of
through the disposal system along with th ...
Removing and installing treble horn -H2- / bass horn -H7-
Note
Removal and installation are described for the left side.
Removal and installation on the right side are carried out in
the same way.
Removing horn
–
...
Stopping the engine
First read and observe the introductory information
and safety warnings
The actions should only be carried out in the specified order.
Step
Vehicles without Keyless Access
Vehicles with Keyless Access
1.
The vehicle must b ...
© 2016-2026 Copyright www.vwgolf.org

 Removing and installing rotary light switch -EX1-
 Removing and installing switch module in centre console -EX23-/-EX30-